Hello Again

Alice Cooper at concert

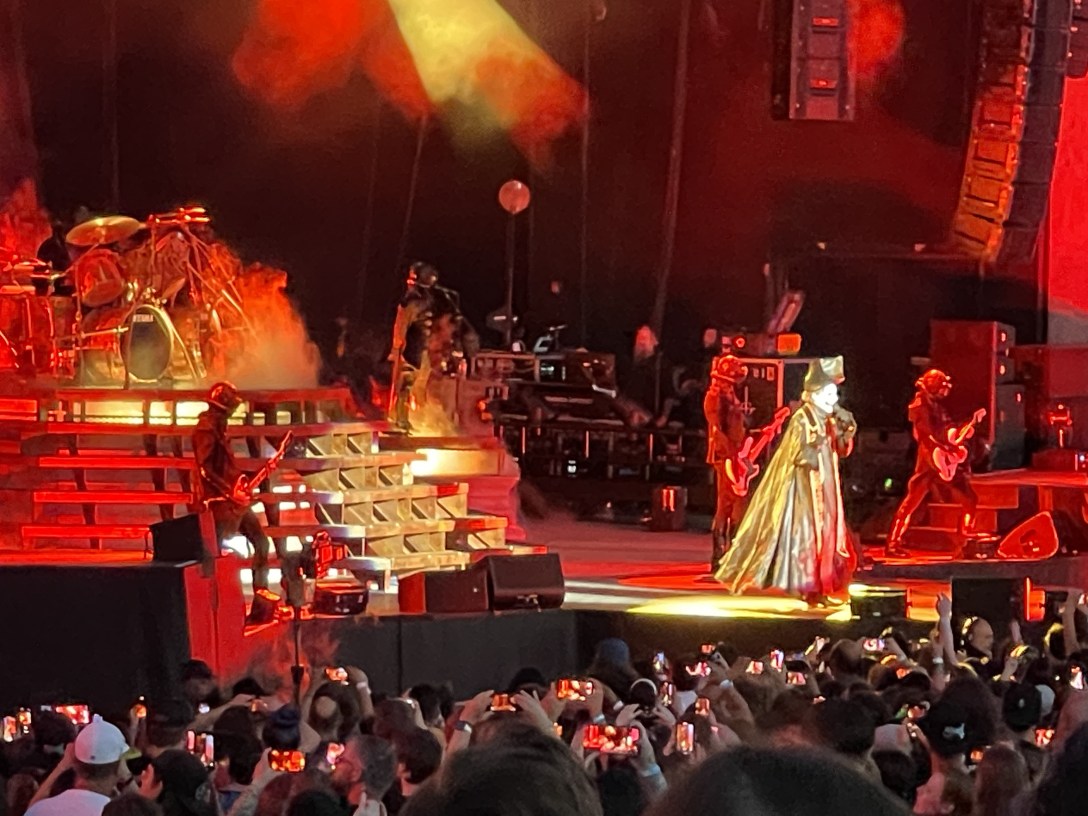
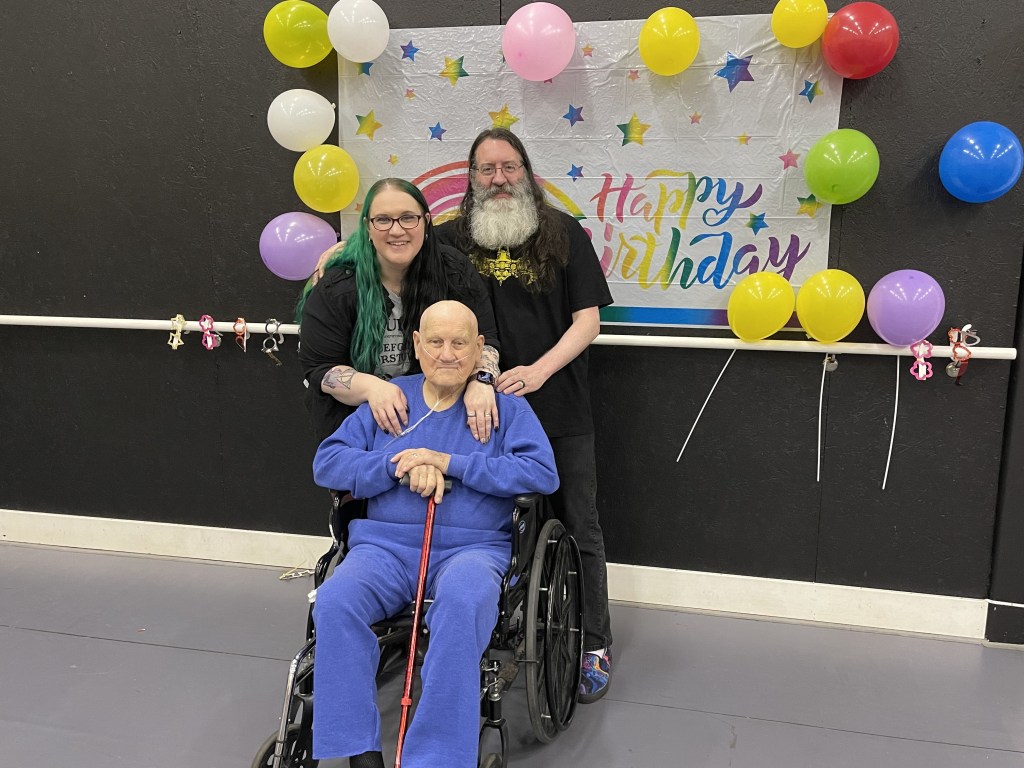
Header image is at Alice Cooper concert. It has been a VERY long time since I’ve posted. I kept meaning to write something up quickly, but sometimes even just a litle is too much.

So, the biggest reason for my delay is depression. I’ve had a few breaks here and there, but I get so wrapped up doing things in those times I completely forget about posting. But depression has been the real drain of my ability to post. But, here are some of the other things that contributed to keeping me away.

Sister-in-law’s wedding

My wife’s sister decided to have a faux wedding ceremony here because her fiance’s family is going to be heading to Texas for the official ceremony. She figured that because her fiance is Muslim and Pakistani some of the people in her family that are important to her would ruin the Islamic cerimony planned for Texas.

Wife & Groom at Harry Potter themed wedding

Since she planned her ceremony in Utah to take place in my back yard, it was my responsibility to get the yard ready and clean all the house that would be publicly accessed. This all took place shortly after my last post and kept me pretty busy. I was also tapped to write the ceremony. That didn’t take me too much time, about 3 hours in a single night. I asked my mother-in-law to give feedback and they just went with my first draft. Overall it was pretty fun.

Passing in the family

My wife’s grandfather has always been a kind and upbeat guy, but he had been plagued with nearly every affliction diabetes can inflict. In his 60s he suddenly lost all his hair, even his eyebrows. About 10 years ago he lost his left leg below the knee. His favorite way to joke about this was when someone asked how he was doing he would respond, “All right and half left.” He always joked that all he wanted for his birthday was another birthday. In 2023, his birthday came shortly after my sister-in-law’s wedding ceremony.

Only a matter of days after his birthday he ended up in hospice before passing away. It was fortunate that there was enough forwarning for most of the family to arive, but even we only made it half an hour before he passed. He was the person my wife felt most filled the role of her father, so she was crushed by his death.

We all helped with the funeral and helping my wife’s grandmother get through the loss of the man she’d spent over 60 years of her life with. She eventually decided that their home was too large and, because she was mostly wheelchair dependant, had too many stairs. She had all of us, her children and grandchildren and spouces, help prepare her house for sale. A few of us also went to Saint George, UT, to get her manufactured home sold. It took over a week of dedicated work by a rotating crew of 4-6 people to pack up her house. It seems like a lot, until you are reminded she’d lived in that house for more than 60 years, of course she was going to fill it up with a lot of memories.

We spent the rest of 2023 helping to keep her company in her new home.

New animals

Anyone who knows me knows I love animals, and most animals like me even if it takes a short warm up period for us to become friends. Well, 2023-2024 was a crazy period of animals moving into our home.

Parrots

A parrot is identified by a curved beak and it’s feet having two toes forward and two toes backward. So yes, Cockatiels and Budgerigars (budgies) are parrots. If you don’t spend a ton of time looking up random information, a budgie is what most americans call a parakeet, but in fact, parakeet is any one of a large number of small to medium parrots, which does include budgies.

On Black Friday we adopted a whiteface cockatiel named Ash. We kept the name because it fit with her black and white coloring. She’s a bit antisocial so we call her our Gothitiel.

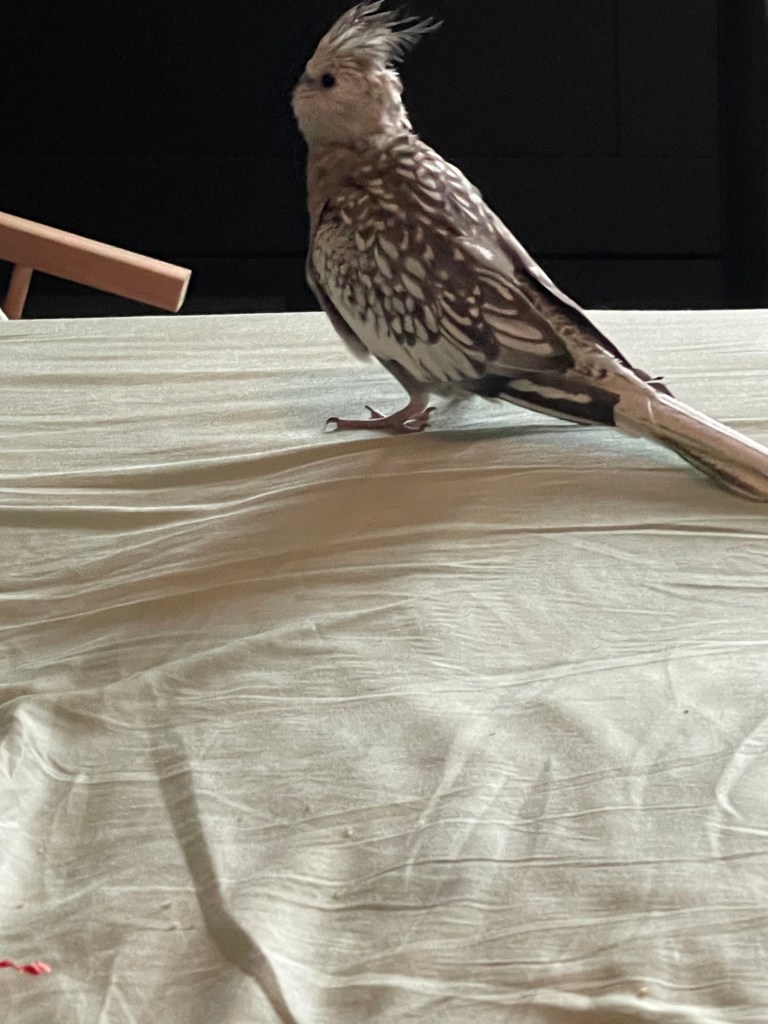
Since then we’ve also adopted a cockatiel with more traditional coloring that we named Hazel. She’s a little bit more social and is actually getting Ash to come out of her shell a bit.

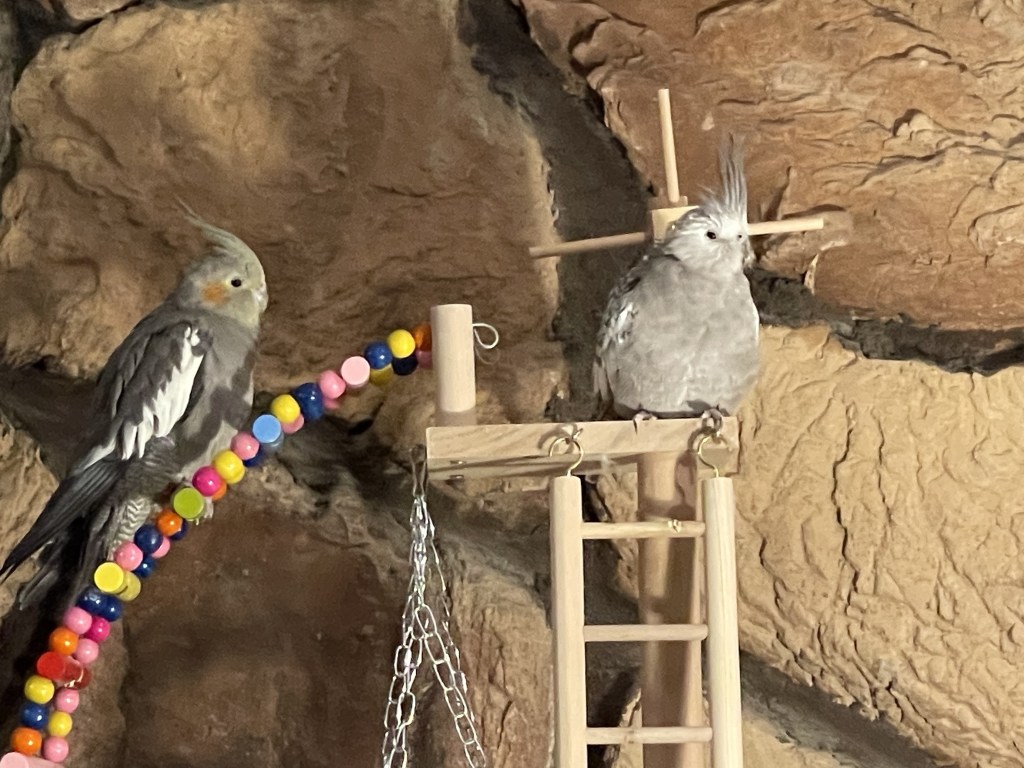
And, though I don’t have a picture of them, we also adopted 6 budgies. Peridot, Opal, Pearl, Aquamarine, Quartz, and Diamond. Each is named according to their coloration. I love watching them play, they are silly, and when they fly the have beautiful tails. We let all of our birds spend a good amount of time out of their cages, so we see how their flying improves as their feathers grow back from being clipped and they get more practice flying around the room and playing together.

Pomeranians

I love dogs of all breeds, but fluffy dogs have always taken a special place in my heart. My dad used to raise Chow Chows, and their silly personalities, ferocious loyalty, and huggable necks just got imprinted on me as the traits of an amazing dog. Anyway, Pomeranians have been my choice of fluffy dog throughout my adult life. Since 2004 I have never been without one, and after 2006 we have had at least two.

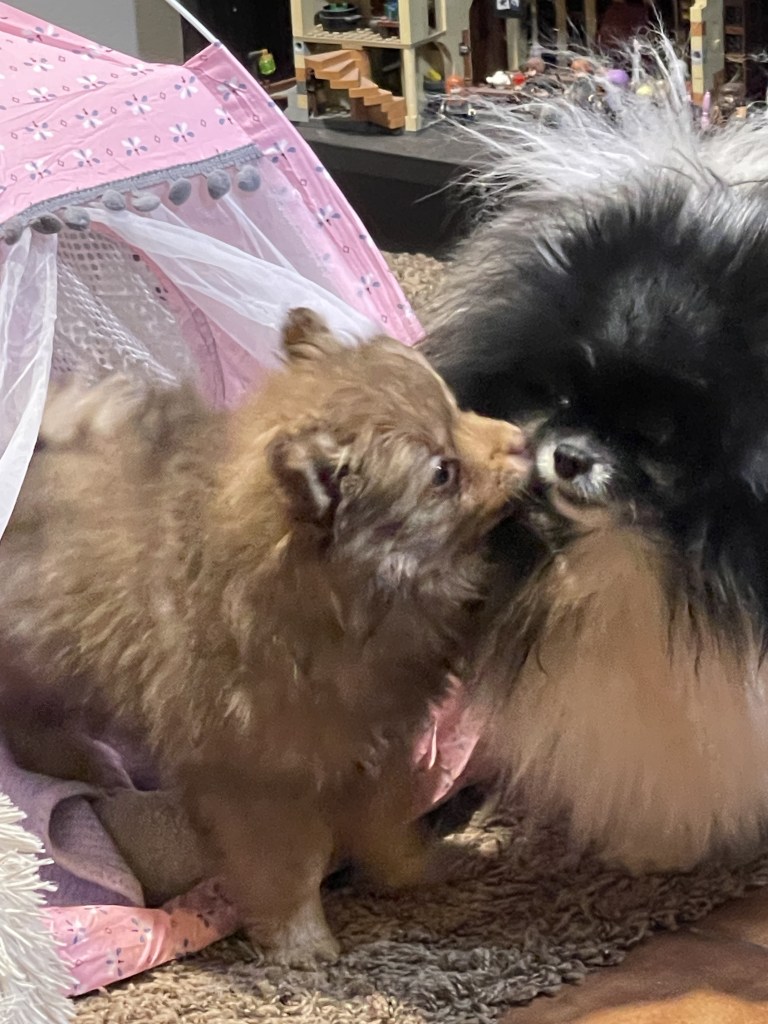
We adopted Lady as a rescue pup when she was about 10. She had been as a breeder for a puppy mill, and from the way she behaved, we could tell a lot about how she was treated. It was not good. But she was a sweet dog. The sweetest you could ever meet. And all we hoped to do is give her the best life in the time she had left. So there was expectedly a period of mourning when she passed away.

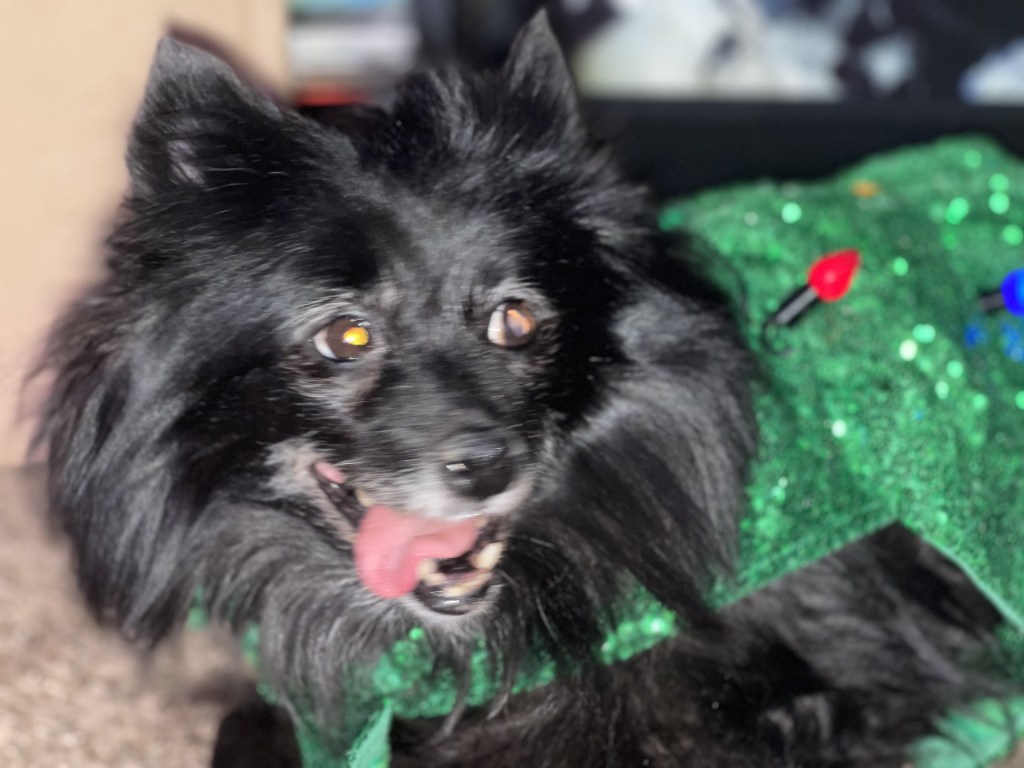
But shortly before lady passed away, we adopted a literal demon and named him Remi. He is a cutie, and people always mention how handsome a pup he is, but he’s a brat like no dog I have ever met.

He’s cute, right? But he has an agression problem that leads him to attack me without warning and with little provocation. My hands and forearms are covered in little teeth marks so we have to keep him away from other people while we are trying to get him looked at and figure out how to help him get past that.

And he wont stop attacking Whisper. Whisper is my support dog and has gotten me through several suicidal times. He is the smallest and lightest of all the pomeranians we’ve adopted, weiging in at 6.5 lbs.Remi will tackle him and drag him around playing and seconds after breaking them up Remi will be right back to attacking Whisper. And Whisper is too gentle to fight back. So when Remi is awake, I have to spend my attention on making sure he’s not being a jerk again.

Additional crafting and projects

Jewelry

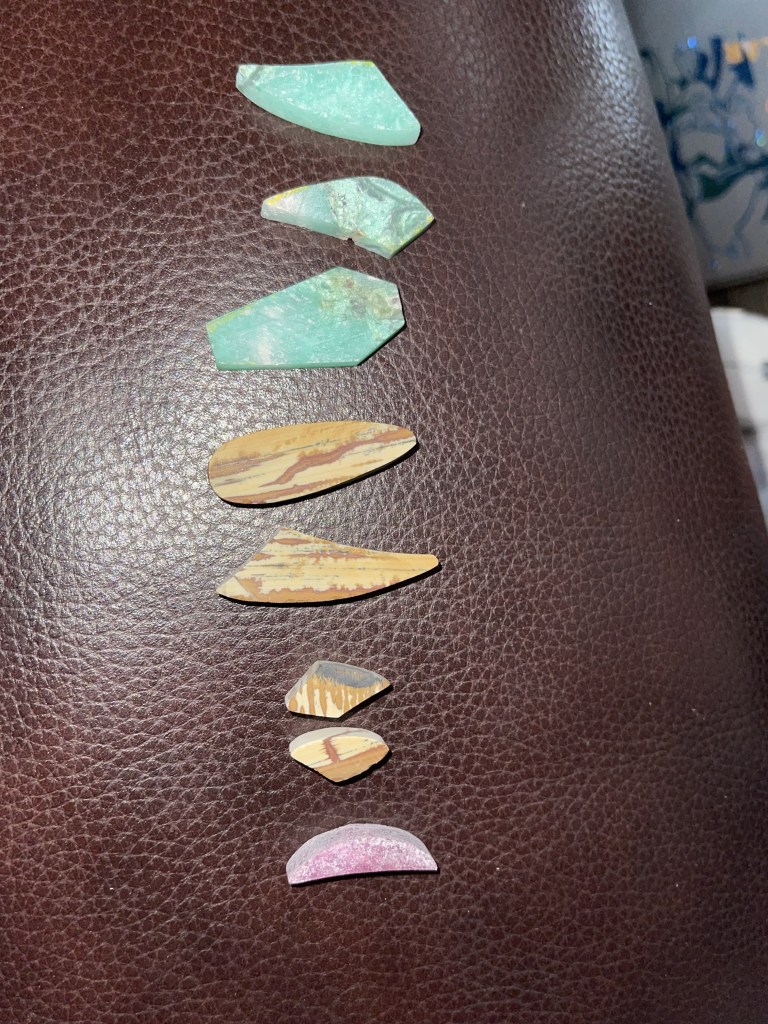
I’ve been working on and off to get some skill in jewelery making. I started with tumbling stones, but getting impatient with the long times it takes to tumble a batch, I started saviing up for a new machine. A cabbing machine. I have fun cabbing, but the only space for me to work is tucked back in the back of the utility/laundry room, right under the drying rack for hang-drys. That means when there are clothes hanging I can’t cut cabochons or the clothes will get sprayed with gemstone infused water. So, not being able to get into it easily means I forget to do it a lot.

Still I keep trying to go at it, and have since got a diamond blade bandsaw so that I can cut slabs into shapes closer to the shape I’m going for, wasting less stone. Now I can get slabs at the gem fairs that come to town twice a year.

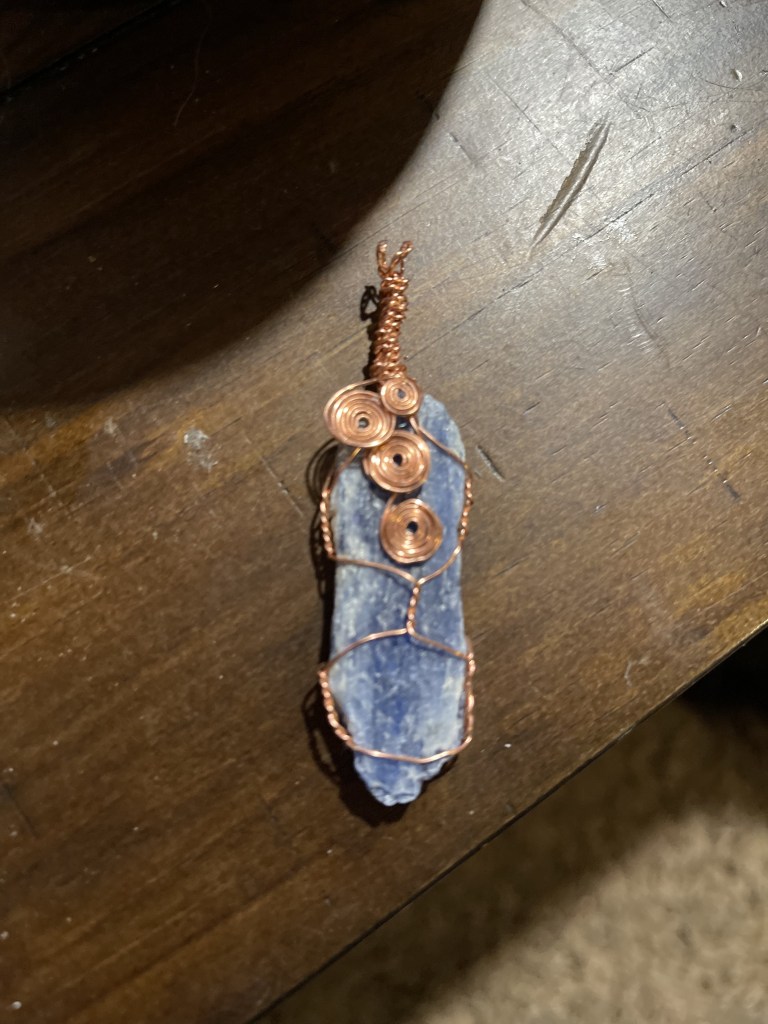
I’ve also been learning to do some cool wire wrapping. Here is the first one I made when I went to a workshop to learn how to get started.

Book making

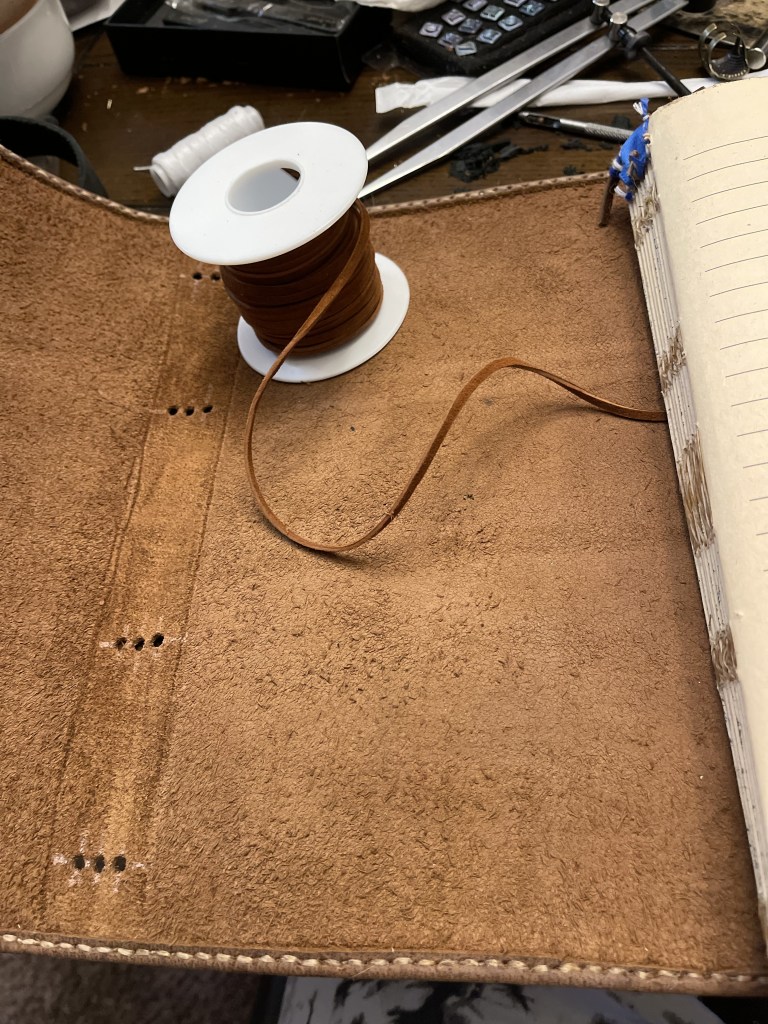
I’ve been making books for a while. My wife is wanting to start an Etsy store so I’ve been working on building up a little stock for her to post. I usually use a cloth or thin leather bound to a hard card stock for binding my books and I’ve gotten pretty quick at the whole thing. I can sew together a book block in just little over an hour.

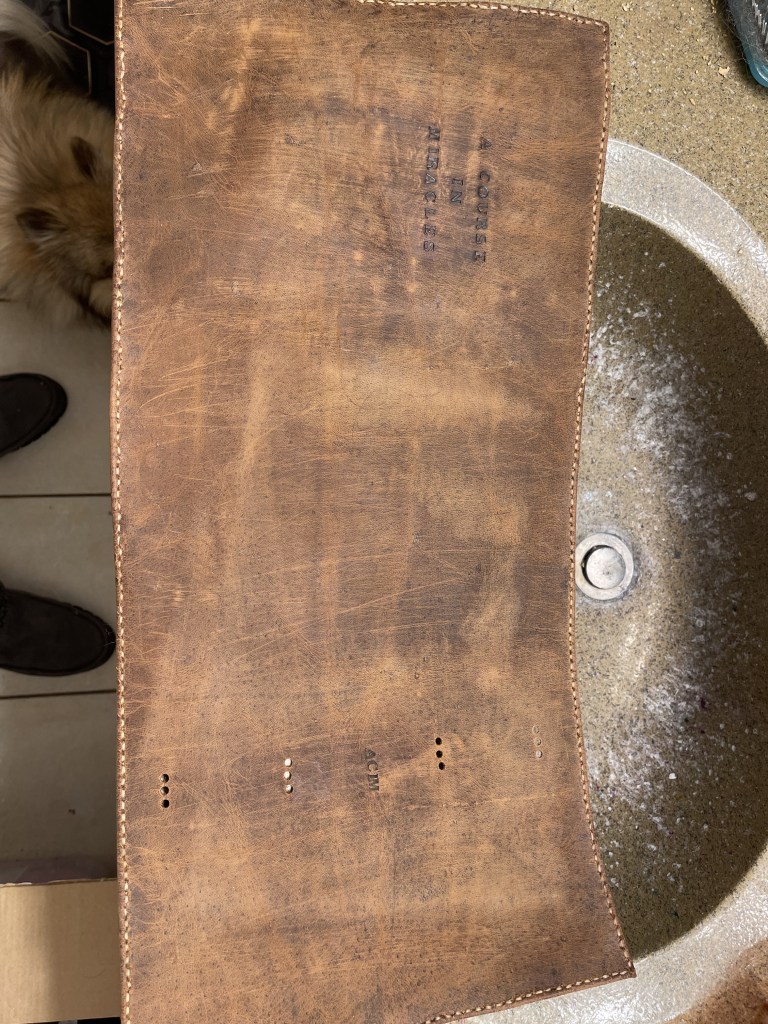
While trying to figure out what my mom wanted for Christmas, she asked for a leatherbound journal for her coursework. I usually make codex style books, but she wanted something more like those leather journals you find on Amazon. So I had to study a few books and figure out how to bind one for her. That and manually lining the paper for the book took me most of December 2024, but I was really happy with the outcome.
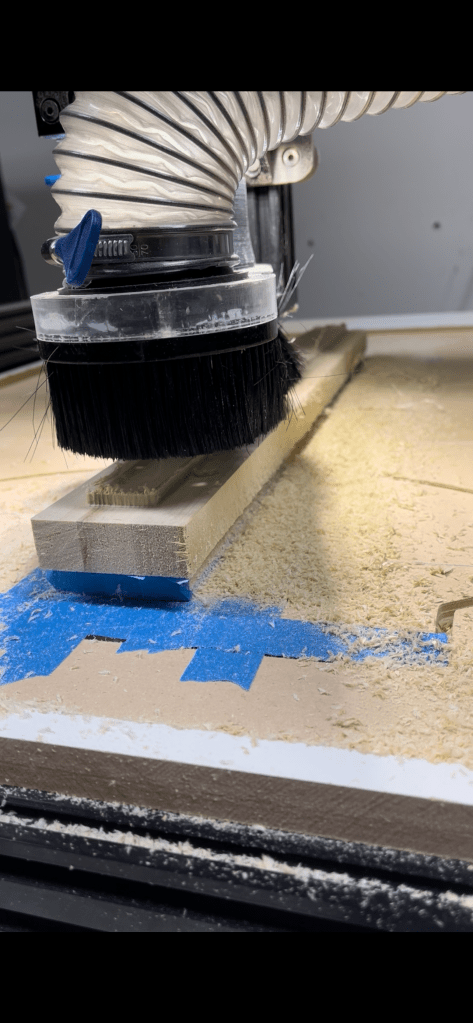
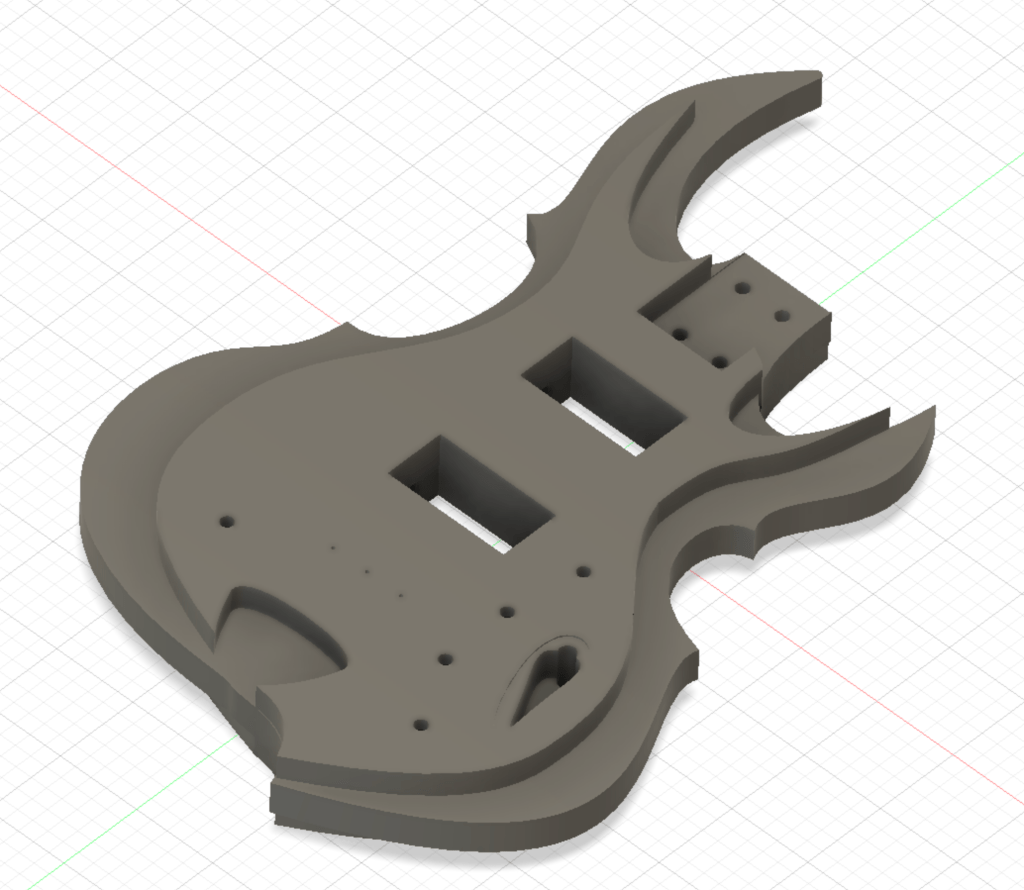
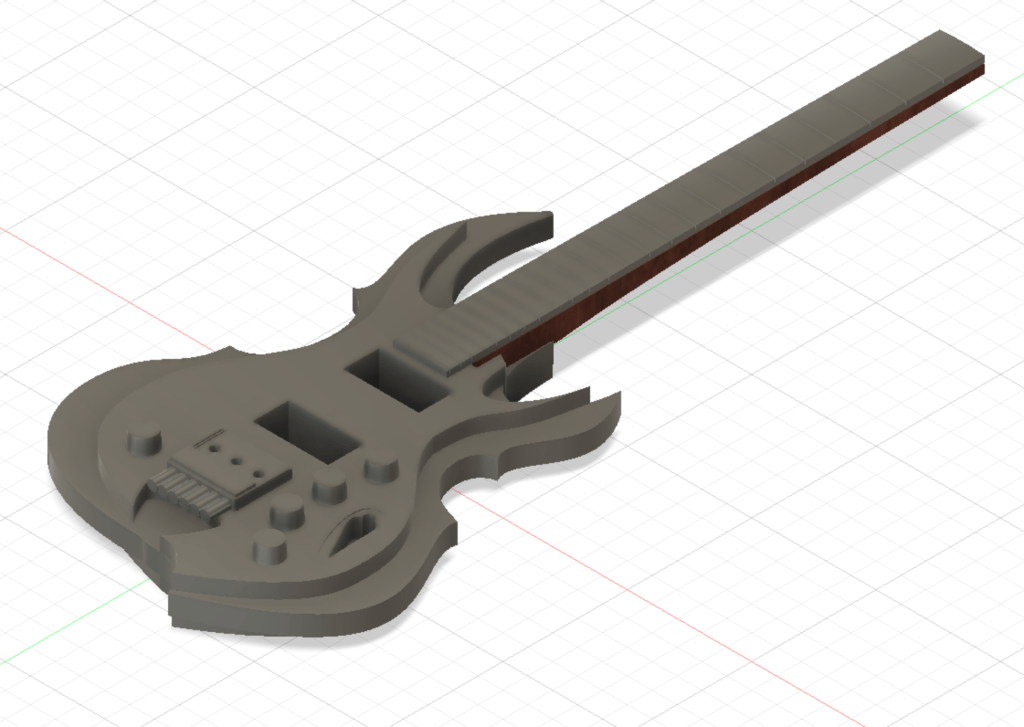
Wood projects

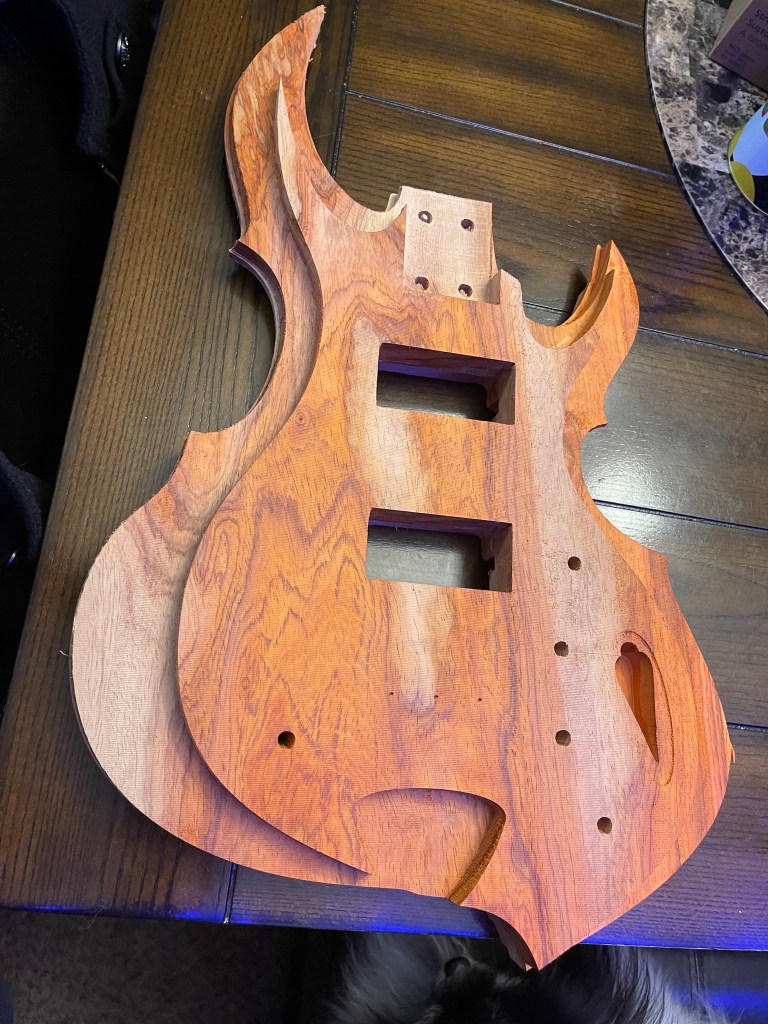
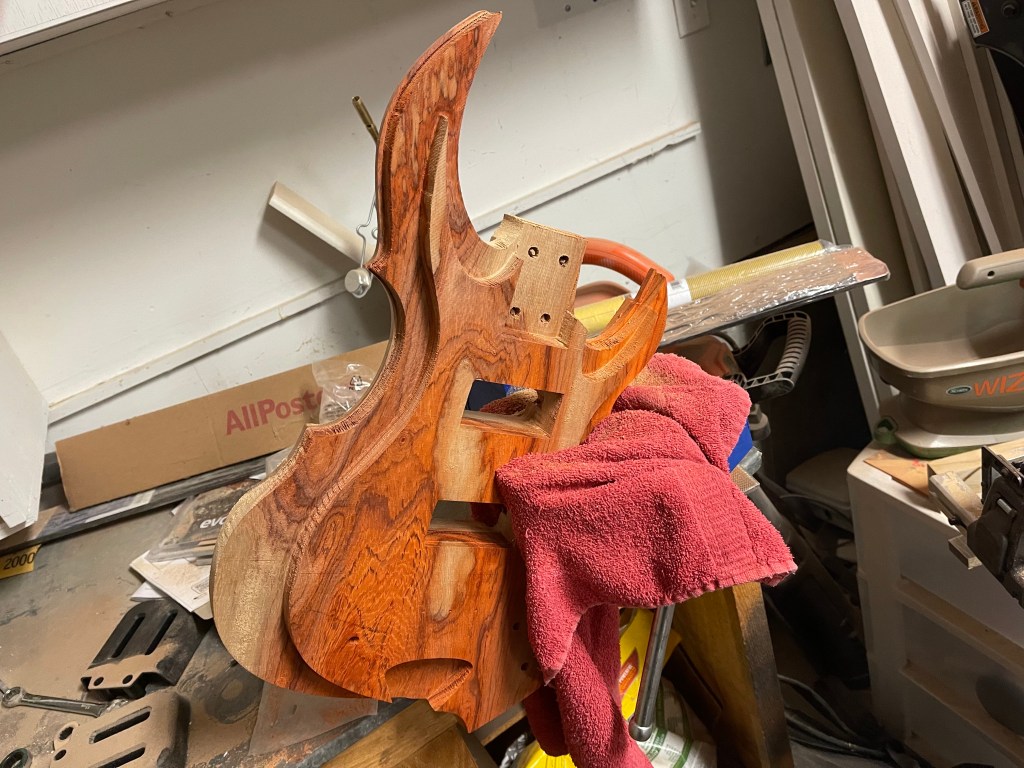
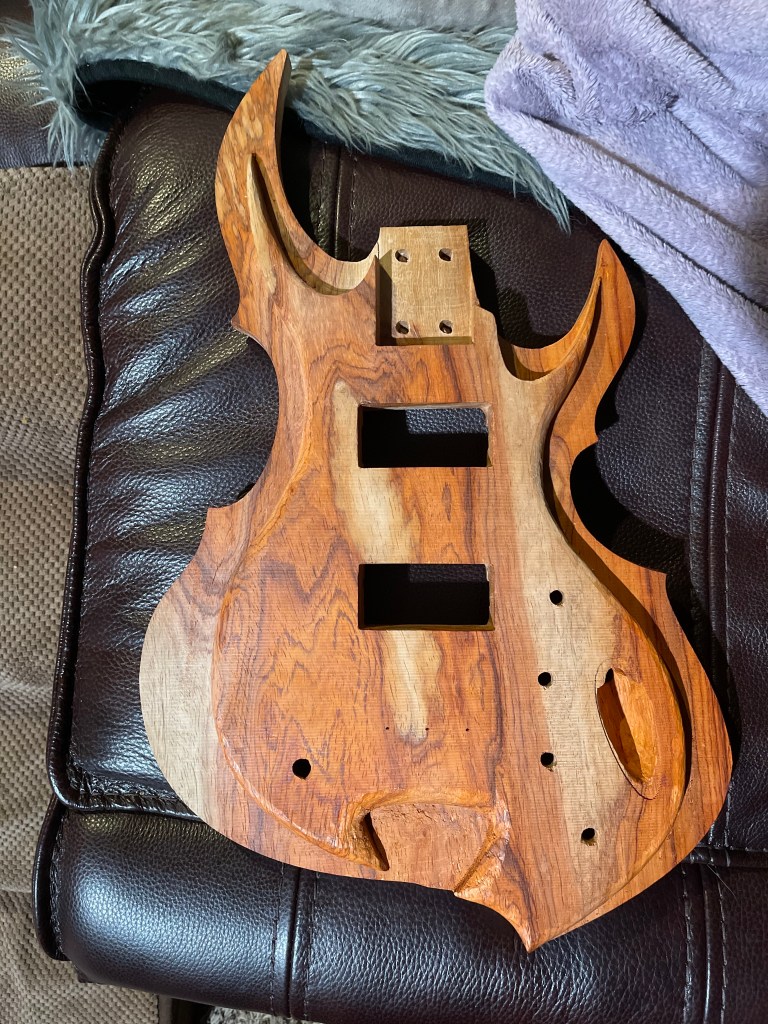
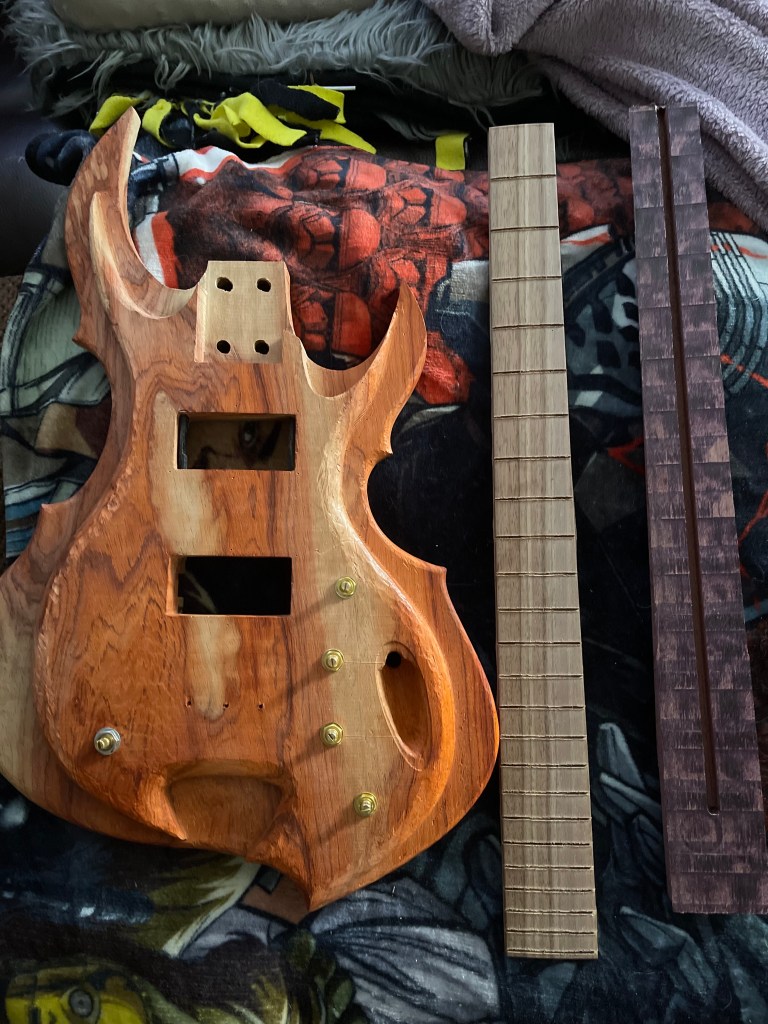
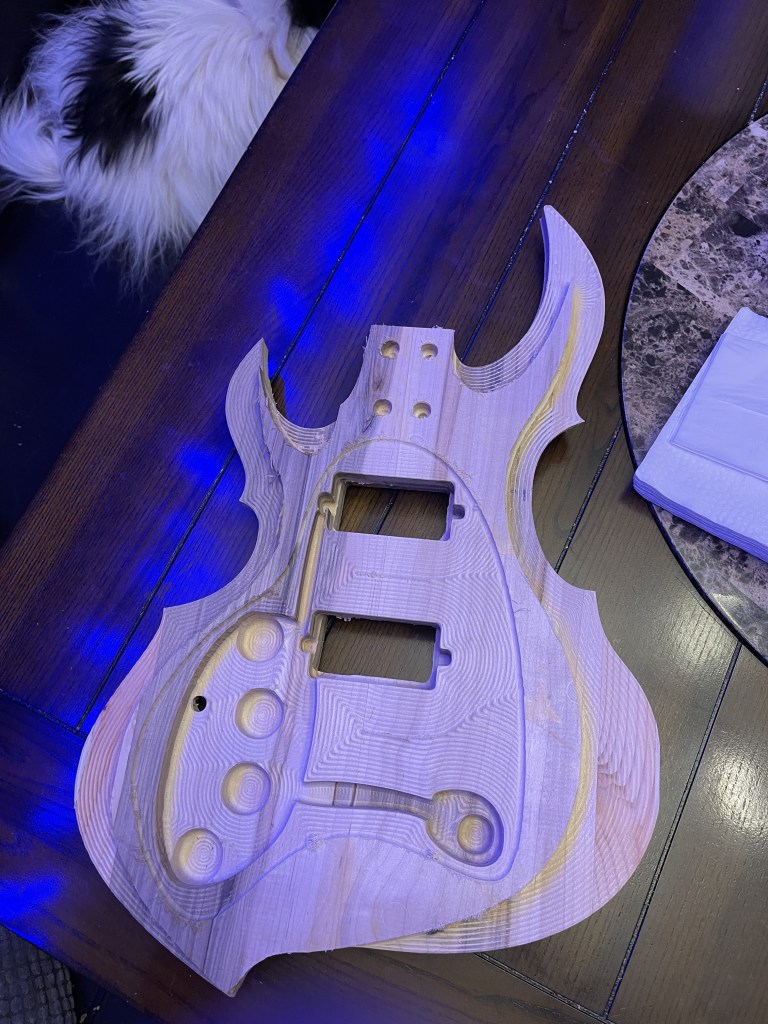
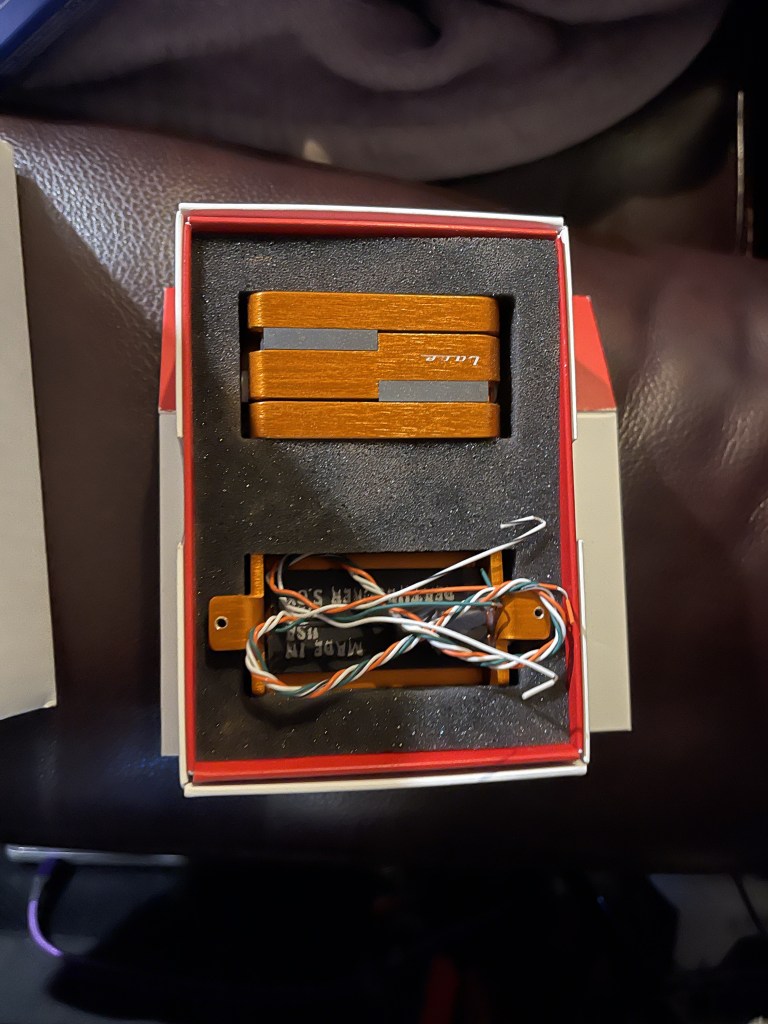
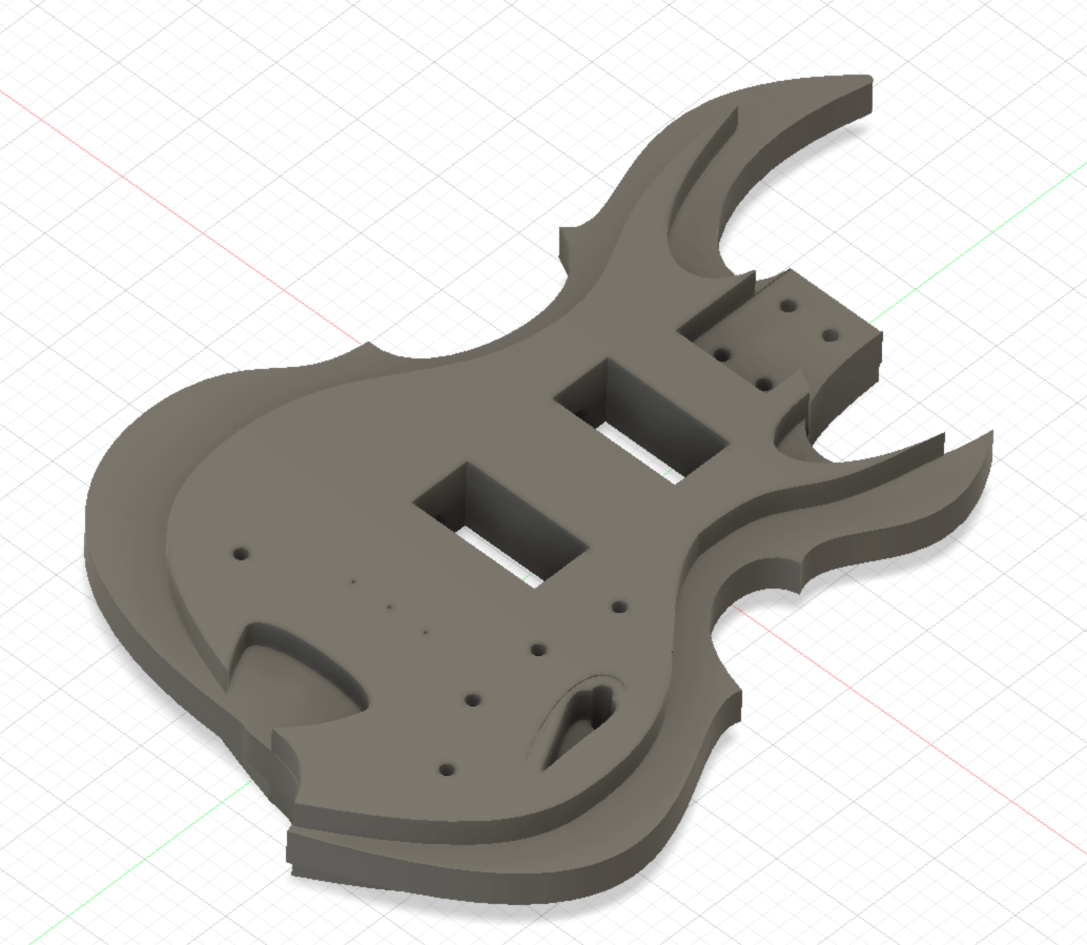
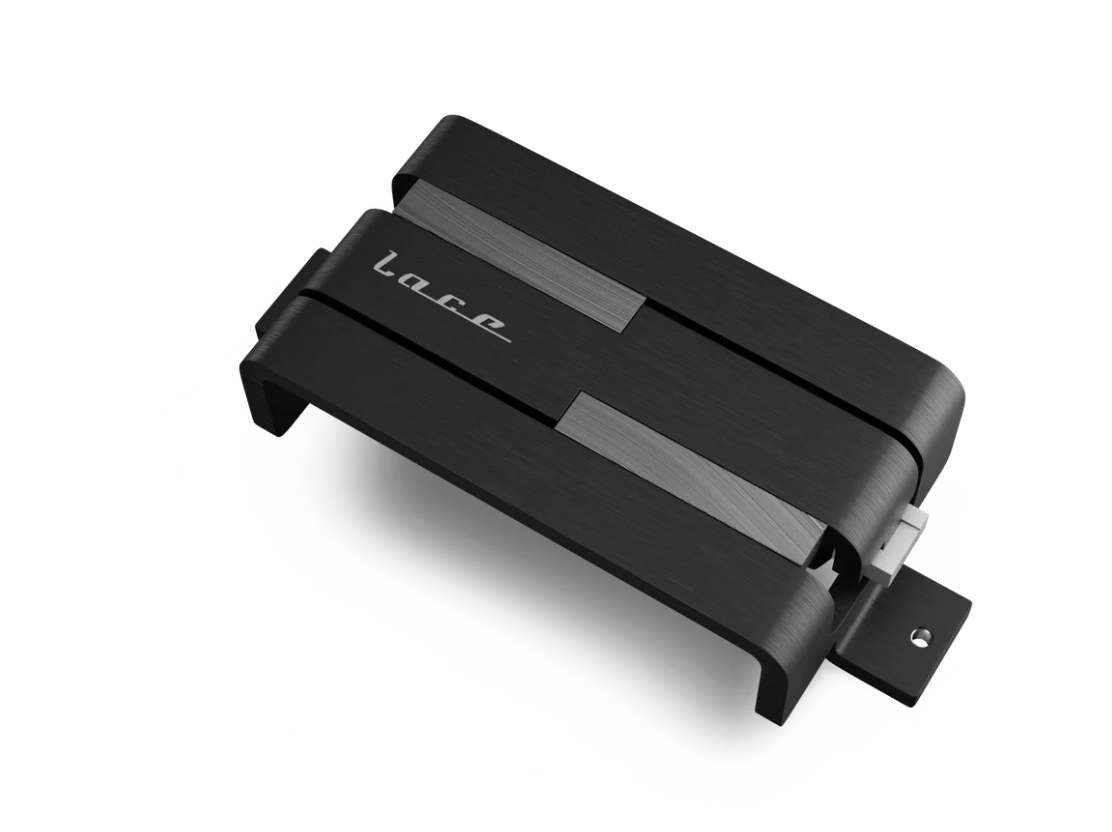
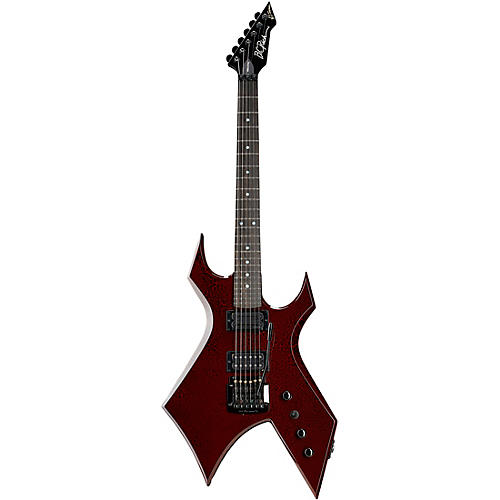
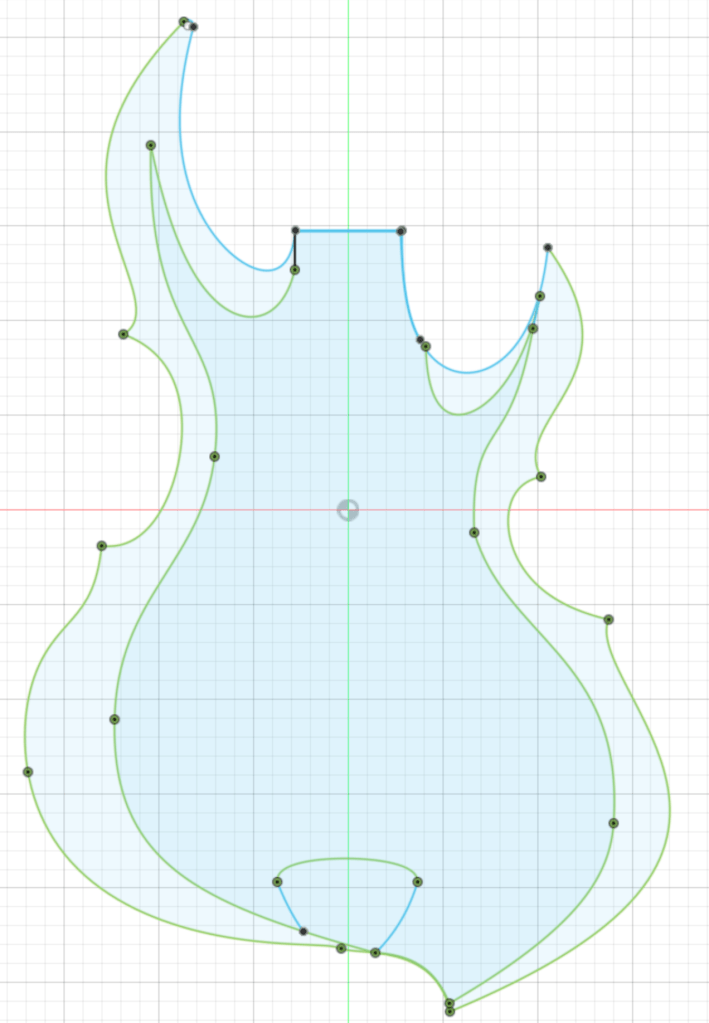
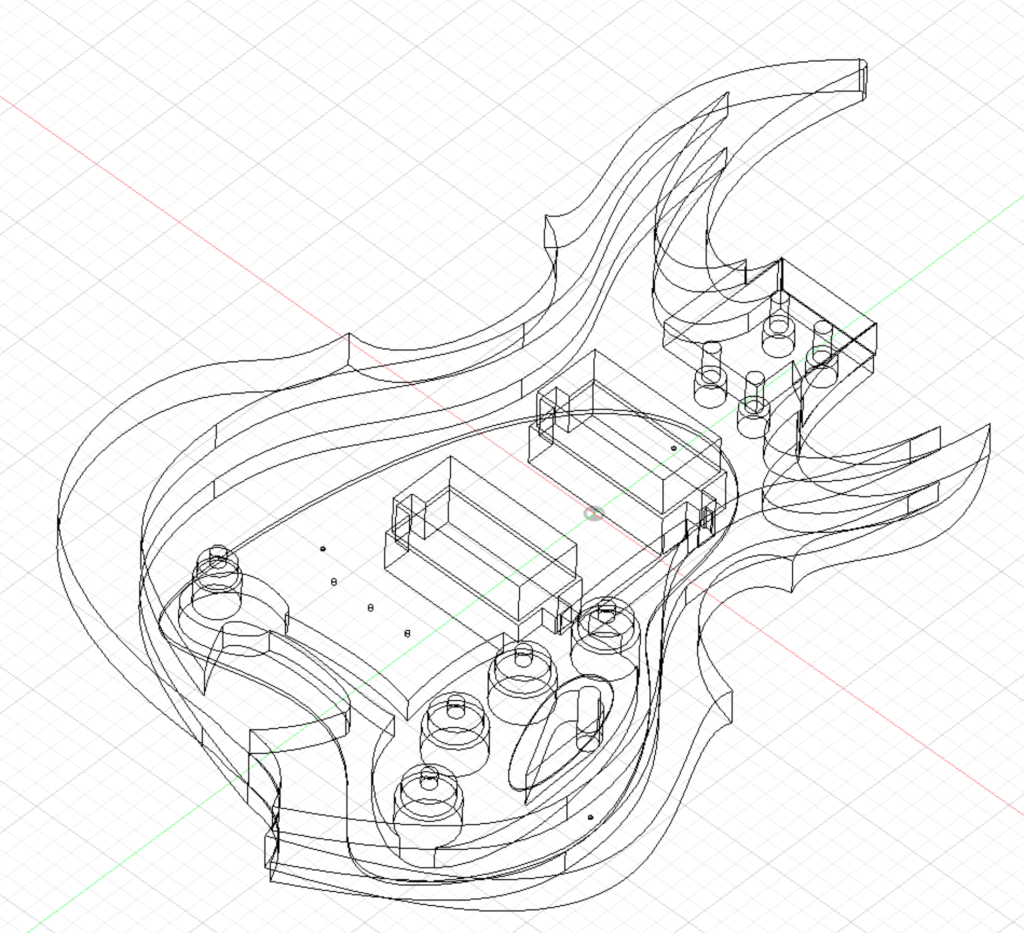
With the guitar 90% done, I had to set it aside so I could use my time and tools for working on a couple of other projects.

Wand holder

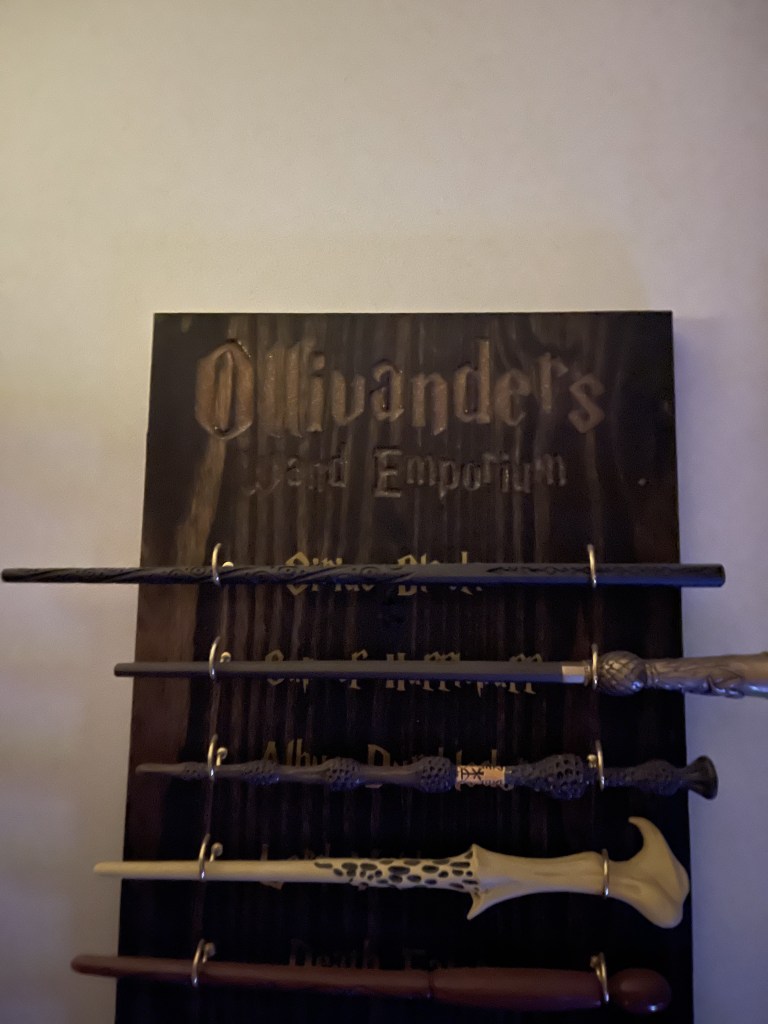
Harry potter is pretty popular with my wife and her family, so of course everone has a wand or seven. My wife thought it would be nice to build a little holder to hang her wands on the wall and label them with which belongs to which character.

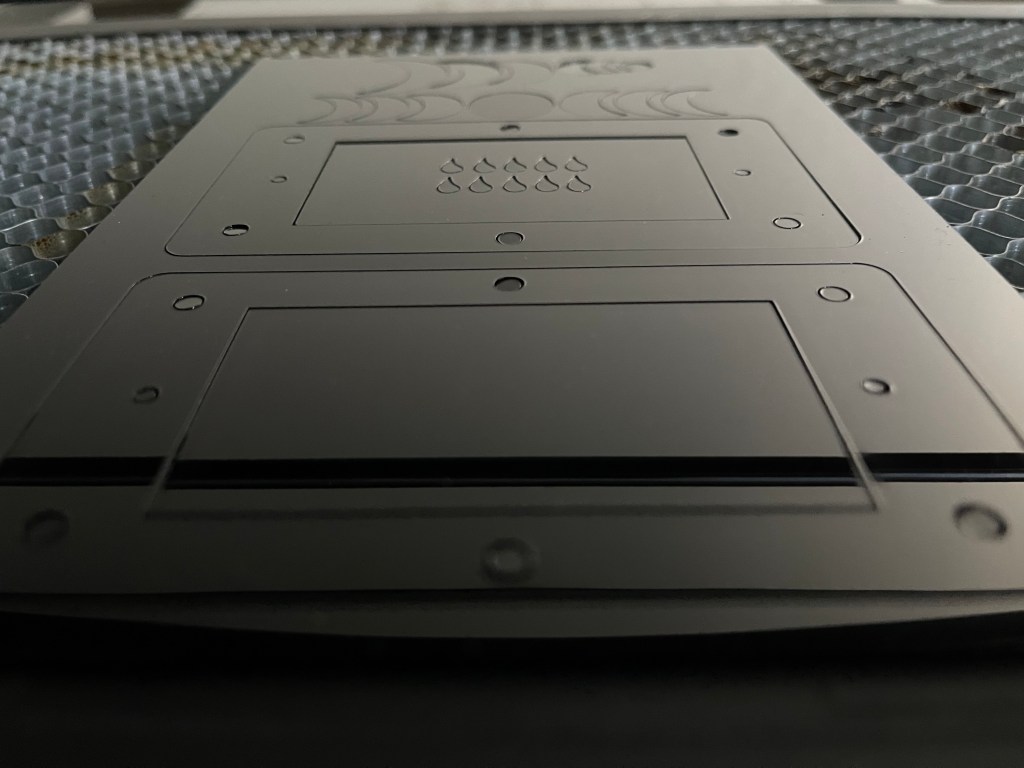
For this one, I used the CNC machine to make quick work of the engraving. From designing to setting up the jobs to mounting the wood and cutting it took about a day. And then we stained it and added the brass hooks to hold the wands. When all was finished my wife added some gold colored resin to the etched words since staining over top of them made them harder to see. I still think it’s hard to see, but she’s happy with it this way. She’s recently tapped me to make one for her sister.

Don’t use power tools with loose hair

I had it reinforced for me to wear my hair tied back when working with tools.

After the job had finished, I homed the CNC machine and bent down to look at something. The threaded rod that controlled the right side of the y axis caught a bit of my hair and wound me down until my face was against the track. I grabbed the gantry and stopped it from moving forward (a Nema 23 motor, 1.8 ft*lbs), hoping the motor would stall out, but it didn’t. I had to search around for a stop/emergancy switch. Couldn’t reach the big red button, but I found that I was able to hit the end-stop for the y axis. After I stopped the progression, I thought I would be able to unwind my hair from the threaded rod but either because of the position I ended up in, the tweek in the squareness of the machine, or the motor’s holding torque, I was not able to get much more than a couple of inches of my hair out. It took me a couple of minutes of feeling around blindly, but I was able to get ahold of a box cutter and had to cut all the hair stuck on the rod while being careful not to cut myself.

If this had been my lathe or sander, or especially my saws, this could have been a disaster. Or deadly. Remember to not work with tools with loose hair! Pulling it back only takes a few seconds. Make a ponytail holder or bandana a standard part of your safety gear. I just strap a ponytail holder over my safety glasses so it’s there when I put them on.

The one that killed my thumb

My wife wanted to make some memorials for her grandfather that she could give out to her family. She took one of this Donald Duck figurines, of which he had many, and some of his funeral flowers and encased them in resin. Once she had the blocks done, she wanted me to make little boxes for them that could be lit up from below with some LEDs.

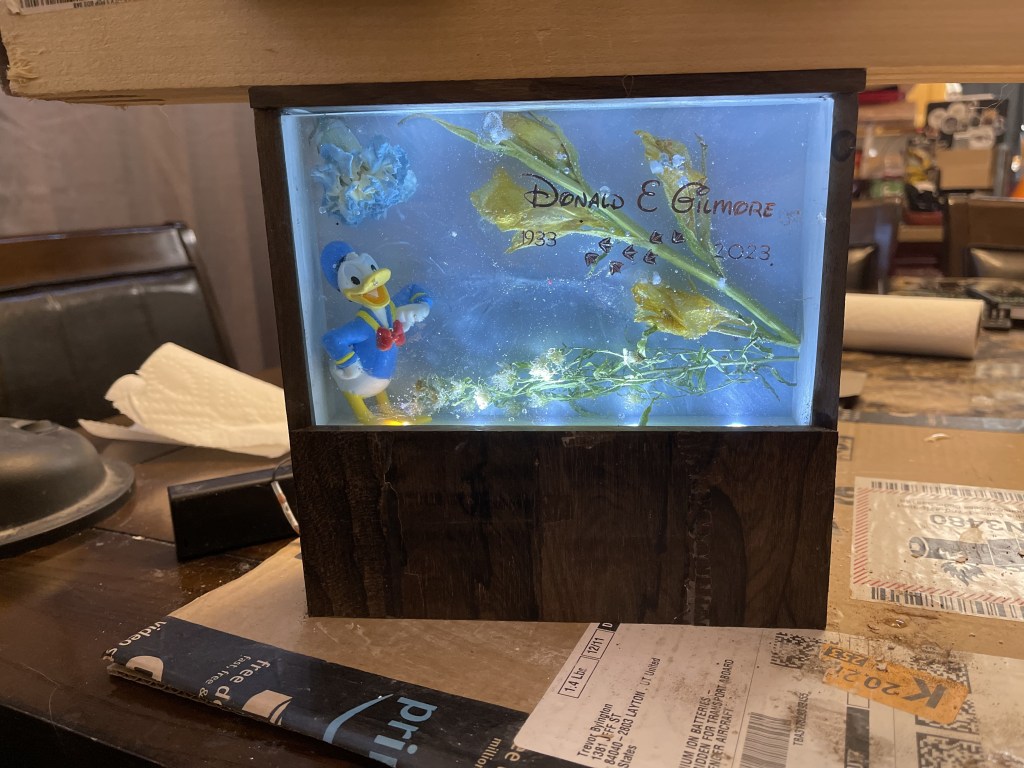
It was during the making of these boxes that I had a misjudgment in depth and stuck my thumb straight into a table saw. I’ll save the details of the injury for the end of the post.

Warning: graphic and disturbing

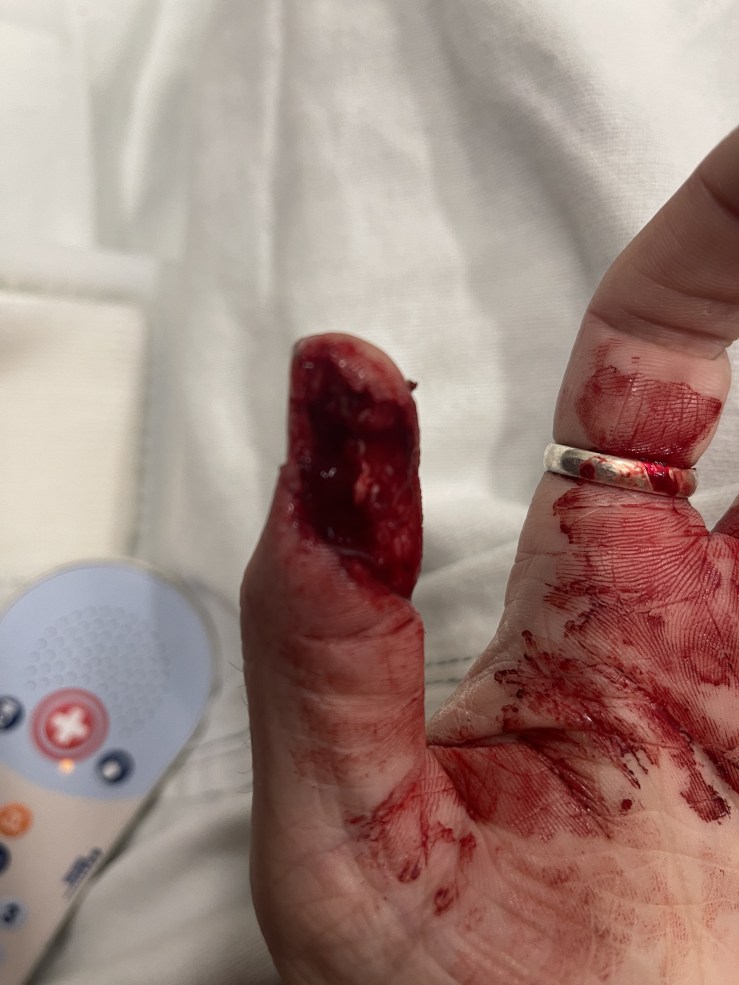
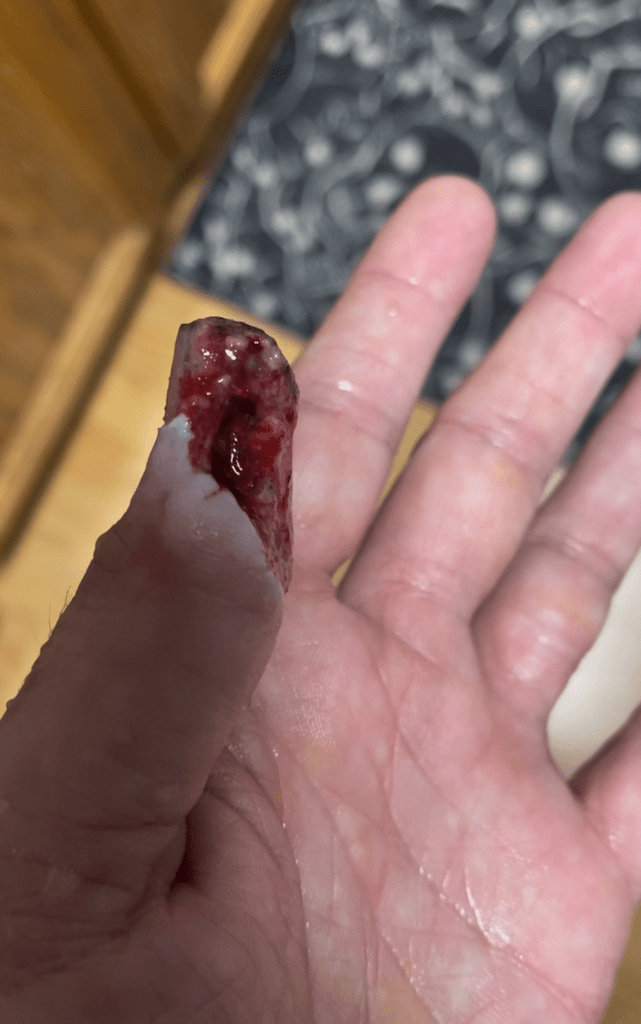
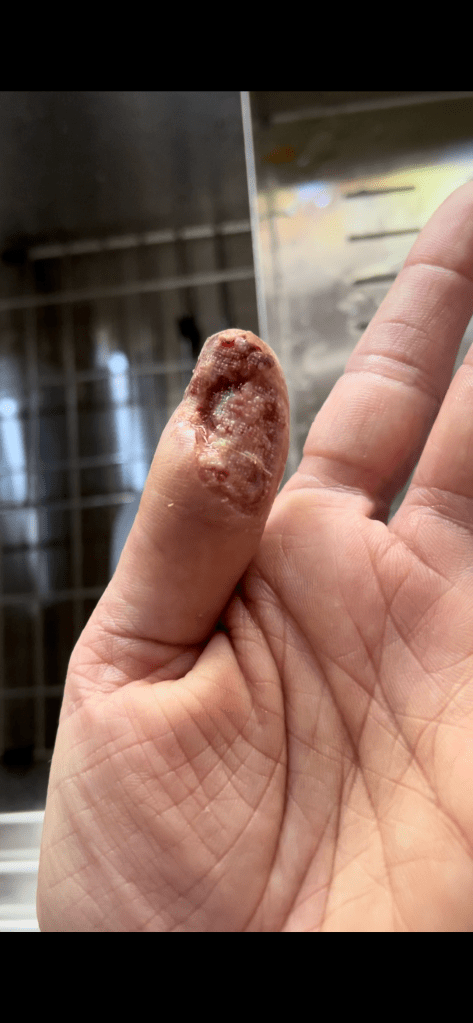
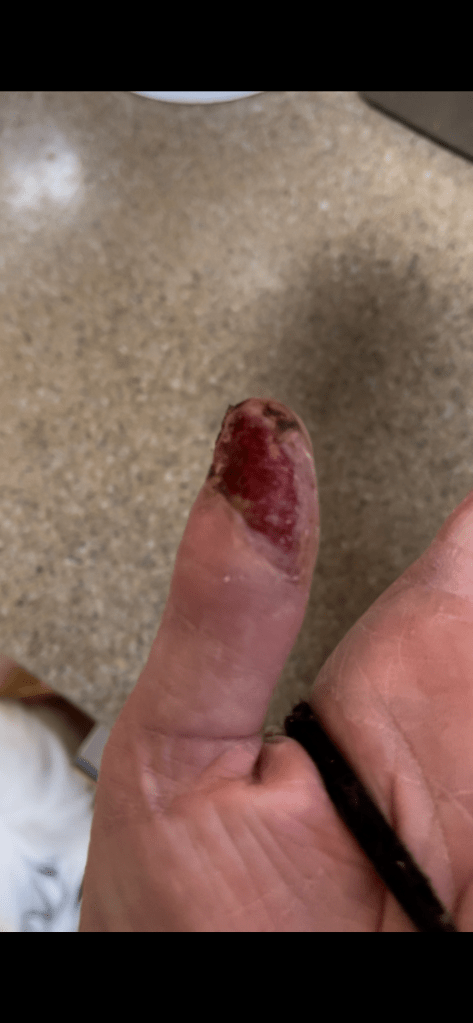
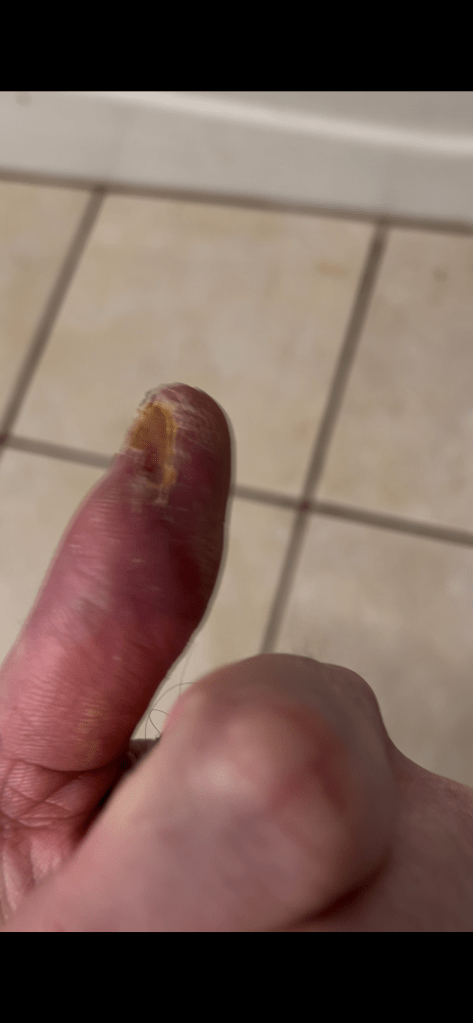
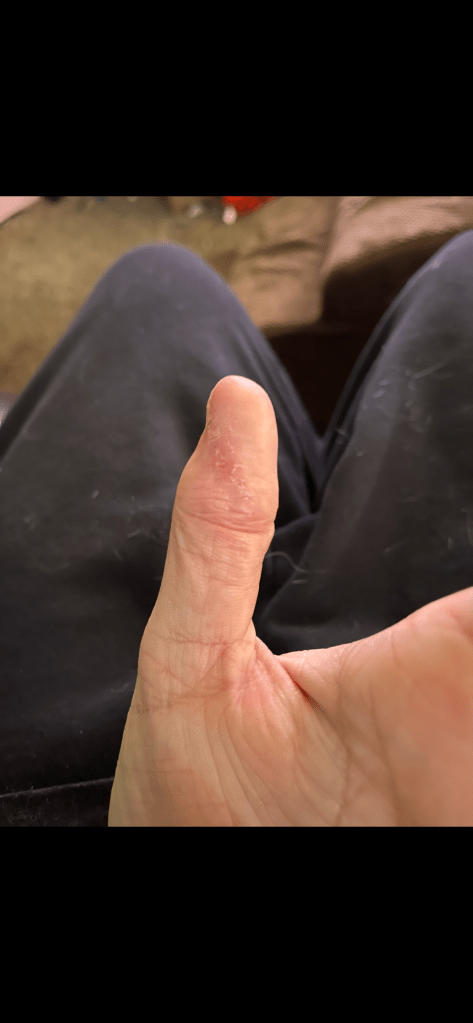
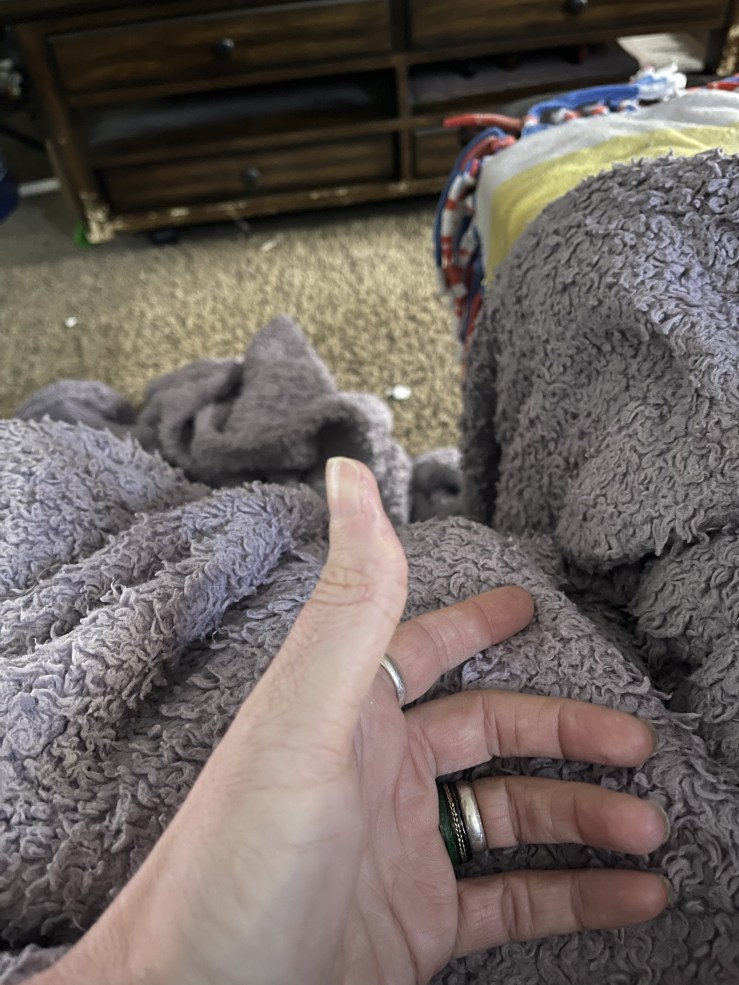
Finally this is the biggest reason I’ve not been here. As mentioned above, while working on a project, my thumb got up close and personal with a table saw in full damage mode. First, let me post a couple of pictures of my thumb today so that you can see that the end of the story isn’t tragic.

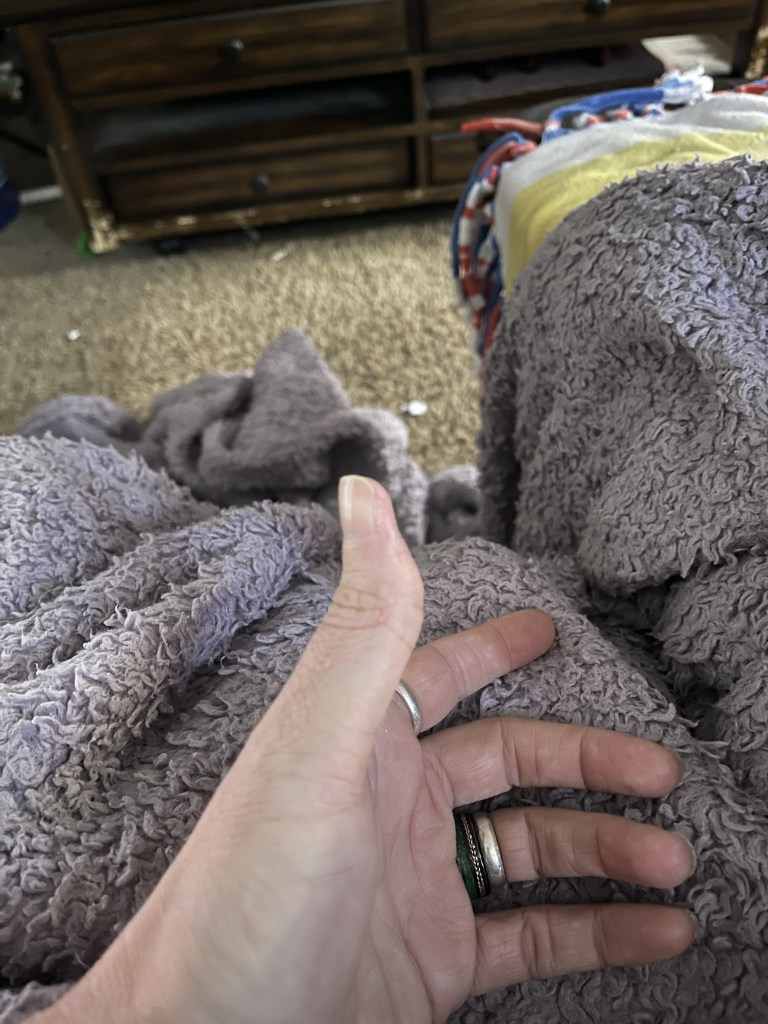
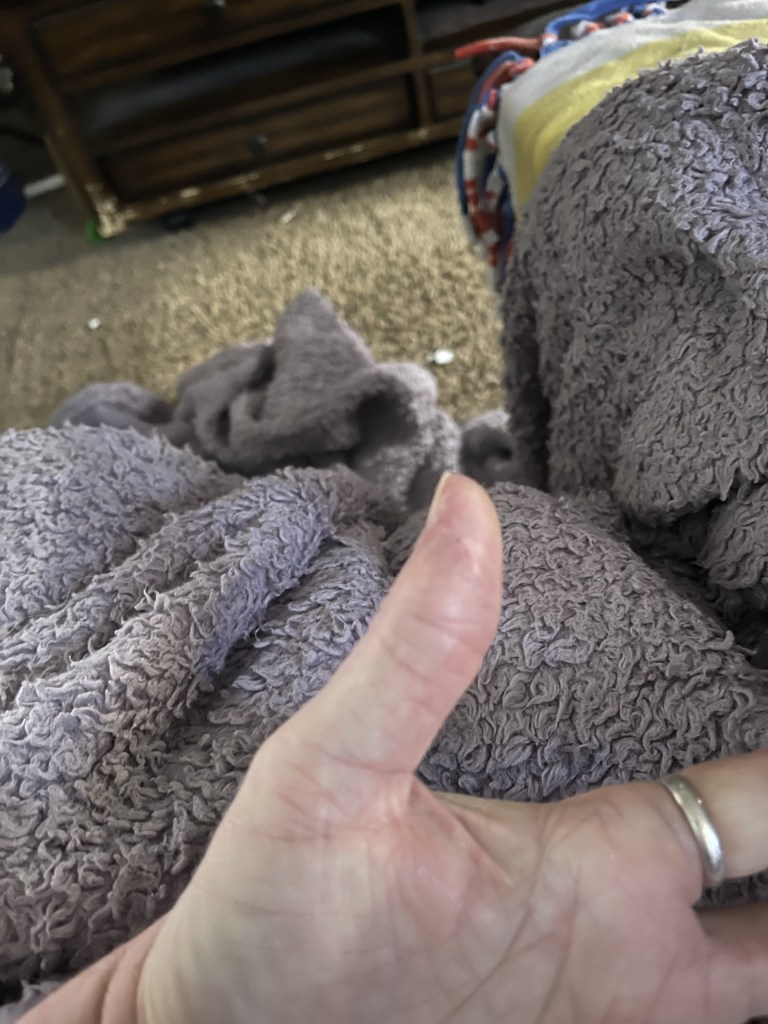
I have recovered about 75% of strength, 60% of sense of touch, 90% range of movement. Overall I probably ended up in the best scenario of a bad situation.

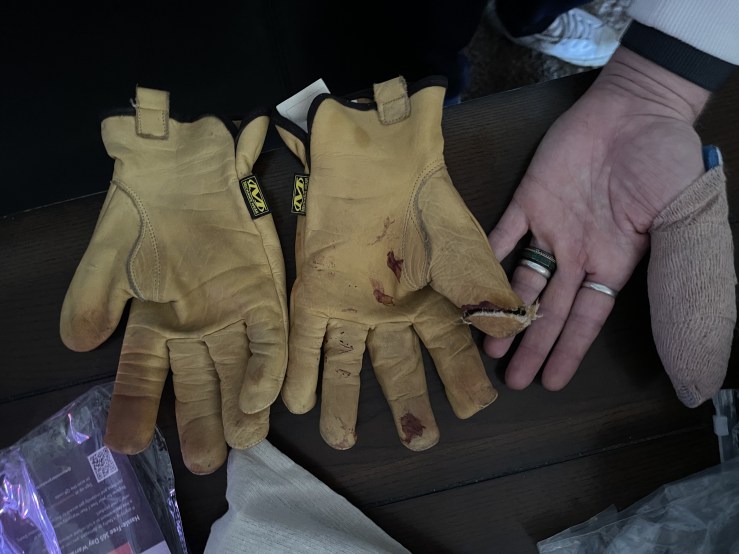
As soon as the sawblade hit the bone in my thumb, it ripped down along the side of the bone for about an inch before kicking it back out. I was wearing leather work gloves but they offered no protection against the blade. I knew right away that I had recieved a bad cut, even though I didn’t feel it yet, so I gripped my thumb with my other hand and squeezed it tight. I made it into the house and told my wife that I needed to head to the ER. While I waited for her to get her shoes on I took off my gloves and grabbed a gauze from the first aid kit and squeezed it around my thumb tight.

Once at the ER we checked in and still no one but me knew how bad the cut was because the pressure I was holding on it was keeping it from bleeding all over the place. After the intake they gave me a wheelchair because of how pale my face was and they knew I was fighting off passing out. Then back in the waiting room I decided to actually look at how bad it was. I asked my wife if she could see the bone or if it was just muscle or something. At that point she realized it wasn’t just a little “boo boo” cut. That’s when the blood really began flowing.

I asked the intake people for something to help keep the blood from running all over the floor. They asked to look at it. Then they quickly got me back to a room. The nurses kept asking why I hadn’t let them know how bad it was earlier. I just didn’t want to take the place of someone who needed it more. As they gave me more and more morphine I kept appologizing for bleeding all over the room (it’s crazy how many places the blood gets from a cut).

They couldn’t stitch it shut since there was nothing to stitch. So they cleaned it and injected antibiotics (all the way into my palm, that hurt worse than the wound). They wrapped it and then loaded me up with gauzes and coban and an antibiotic to put under the gauze. They give me 3 pain pills and then send me on my way.

The next week I had to set up an appointment with an orthopedic surgeon. But with the gap between the ER visit being about a week, I needed to set up an appointment with another doctor to get some more pain pills. He totally thought I was shopping for pills, until I unwrapped my thumb. He saw it and immediately needed to pull in two more doctors to see it because they were surprised at how bad it was. I got the pills after that.

Orthopedist said that I could either do a skin graft, or just let it heal naturally. With the option between 2 pains plus a surgery bill, I opted for natural healing. It took almost four months for it to finally stop bleeding every day and six or seven months for new skin to completely cover the wound.

Now I can use my thumb normally, mostly. Pressure on the side can hurt because there isn’t much fat or muscle under the skin to cushion the bone. Nerve endings havent quite grown back to all the new skin, so touch is a bit spotty. There are a few places near the edges that have extra sensitivity and feel pain extra stongly. Movement is nearly the same as my other thumb, which was one of the biggest surprises to all my medical caregivers. My grip isn’t as strong as before, but I can’t really quantify that.

Look away now

I know sometimes descriptions just don’t get a real sense of how bad something is, so in the spirit of finalizing my excuse for not being here, I am going to post the pictures of my thumb. If you have a weak stomach, or a strong sympathy response to injuries, I don’t recommend going any further. I have a strong sympathetic response and even fainted once at a book reading (“Guts” by Chuck Palahniuk). I am the kind of person I am warning not to look.

  • Injury in the hospital
  • Thumb Dressed, Glove cut shown

(Super) Slow Going

Look, another band for you to identify from another concert I attended. This one is probably much easier to identify because of their very unique costuming. I’ll post the name at the end.

You can follow the journey so far by following these links: Part 1, Part 2, Part 3. I’d also like to point out that I’ve managed to stick to this project for almost 8 months now. I must really like it.

As mentioned in my previous post, I didn’t want to run super agressive cuts because my real stock had cost me so much. Not to mention it has some of the most beautiful figuring I’ve ever seen in wood and I’d never be able to find it’s equal again. This means that it took days for the cnc router to cut it to shape. Looking back now, I totally could have sped it up, but I don’t hate that I took my time.

As a side note, padauk has a super pleasant smell. While doing a surfacing pass, I had the router rotating at a bit too high of a speed and scorched the wood in certain places. It smelt like incense. Slowing down the spindle still produced a pleasant smell. In fact most of the woods I worked with on this project smelled very nice.

Despite my best attempts I was unable to align both the top and the bottom cuts of the body, so using my new rasp was necissary.

This only took a few minutes, but did change the shape slighly (about 3-4 mm overall) and offset the back and front inner cuts slightly and I had to fix those too. Most specifically, the pickup holes were off a bit and I could not fit the pickups through the holes and I had to spend the rest of the night evening those out.

Another quick note about pickups. In most guitars, the pickups are connected to the pickguard and pulled toward it by the mounting screws, not screwed into the body of the guitar and held away from the wood. Unfortunately for me, I believed the second to be the case, and had based my design on being able to screw the pickups to the wood from behind. Once I realized my mistake I tried to quickly pivot and fix the problem and add plates around the pickups, thinking this was the only way to correct it. If I’d have thought a little bit longer I could have realized that I still might have been able to mount the pickups through the wood by thinning out the body in that area and mounted the pickup through the body just like a pickguard. Hindsight, right? Anyway, I designed and laser-cut these plates in black acrylic.

Once the body was done, I began the neck run. The neck wood I had chosen was zebrawood, and again, I had the problem with the top and bottom being offset slightly. Once I rasped the edges flat, the groov for the truss rod was too far left and the rounding of the bottom was too far right.

I had just received my wood carving tools and with them, a draw knife. I’ve never used any of these before, but the draw knife seemed like the perfect tool to even everything out. Short story shorter, it’s not. See, wood will tear along it’s grain if you catch it wrong. And I caught it wrong. In just 3 draws I managed to tear the neck nearly in half. So I had to order more wood. This time I wanted to avoid zebrawood and went with purpleheart.

I ordered two pieces of wood for the neck and once they got here, I got to cutting the first one on the cnc machine. And while that was going, I started in with my carving tools on the body to round out the edges and try to finish up the shaping.

The towel is to try to keep the vice from marking up the wood.

I bet you’re expecting me to give a list of problems I had with the carving tools. Well, the answer is “nothing.” This time I paid attention to the wood grain and how the wood behaved under the gouge and went slowly with short cuts. Things turned out good. I made sure to leave myself enough to finish the shaping with some 80grit sandpaper.

Buuut, while I was carving away, I found out why you needed to have enough masking tape on the table. While cutting the channel for the truss rod, the first neck wood came loose and rode up into the router’s spindle, driving a 5mm groove right through the neck, and then tearing out the side. I tried to figure out how to save it, but the neck was gone. Time to toss this one in the scrap pile to figure out what I can make of it later and start on that last neck.

Finally, this last one came out fine. Slightly offset, but I made sure to leave myself some room for sandpaper corrections. Fretboard, some black walnut, came out fine on the first try too!

This picture is a little bit early in relation to my story, but it’s the only one I took with all 3 separate parts.

Anyway, I’ll pick up from here in my next post.

And as promised, the band in the featured image is Ghost. The show was very fun; lots of visuals, lots of costumes, lots of loud, and lots of interaction. This was an outdoor show, and the weather leading up to it had been insanely hot (100 degrees plus). Luckily the night before it had rained and during the show it was threatening to rain, so we didn’t die, and the band didn’t die. The music might not be for everyone (with a lot of devilish overtones), and the theatrics might not be for everyone, but I thought it was great. I recommend going to a Ghost show if you get a chance.

Test runs and deliveries

Quick, name the band in the feature image!

You can read the first two posts in this set by following these links: Part 1, Part 2.

So I had my parts ordered. Body wood from Maderas Barber, neck wood from Exotic Wood Zone, the tuner/bridge from hipshot, pickups from lace, and the potentialmeters and capacitors and wiring from amazon. But in the in-between time I wanted to get some tests in to make sure my model was viable and make any small tweaks before running my CNC machine over the expensive woods.

I made a trip down to Lowes and picked up some cheaper wood to work with. A piece of poplar that looked big enough to cut the neck out of and some oak that I could cut & glue into the same size as the body wood I was expecting.As you can see in the picture I kind of suck at estimating sizes and had to add some extra wood to the ends.

I didn’t want to cut too agressively because I wouldn’t dare risk cutting super agressively with the wood I’d actually be using. That meant the cutting took forever. Seriously. 3 or 4 days running from about 9:00 A.M. to 10:00 P.M. First lesson I learned in this test: Getting a good alignment on side 1 and side 2 of a two sided routing is a lot more complex than just squaring up along the bottom of the wood. There were small differences in side 1 and side 2 of the wood along the edge that cause me some frustrations. I decided that in the future I would use dowels in holes drilled through the wood and into the table in the center of the wood to assist in aligning the top & bottom. Still, I was only off by about a milimeter in each direction, something that could be sanded out.

Second lesson, milling only part way on one side and the rest of the way on the other alleviates concerns about collisions between the router and wood. And this is why we do tests before.

It was thrilling to see my model as a physical thing.

Next I ran a test on the neck. This time things were much more frustrating. I tried the dowel in the hole thing, but my holes were not tight enough on the dowel, so there was some sliding as I was setting the part down on the table. Secondly, I had not realized my tram had gone out of square, so as the head moved further back on the table, it was moving more to the right. So when both sides were done, the offset had doubled and left me with a frustrating puzzle to figure out.

If you’re wondering about all the painter’s tape, it’s a trick I learned by watching the openbuilds videos. With a clean surface you put the tape down on your bed, a bit bigger than your stock. Same thing with the underside of the stock. Then you superglue the two sets of tape together. Then you let the glue cure, it only takes a few minutes or so, and you can use accelerant that makes it almost instant. Now you have secured your stock to the table but are able to remove the superglue via tape and have a clean bottom to your wood. But you need to make sure that: 1. You have the tape on the table covering enough area to resist the pressure of your routing bit moving horizontally through the stock; 2. You have enough surface area on the bottom of your stock to hold it down and resist the forces trying to push it around. Nothing in this project has been a problem with that second consideration, but I had a couple of catastrophic failures because of the first one.

While the body was being cut, I received some deliveries, the amazon orders and –

Nice, right? I couldn’t wait to try them out, but since I didn’t really have a way to test them I’d have to. As soon as the body was done, first thing I did was try to sit these puppies in the holes for the pickups aaand, they didn’t fit. The holes on the body were too small, so I had to wait for payday to head down to Lowes and get a rasp. Sandpaper was going to be be ridiculous to clear the holes out.

Anyway, I’m going to end this post there. Because after pulling the body off the cnc router, the long slog of hand shaping the wood began and that’s a whole post of its own.

And the band at the top of the post? It’s Lacuna Coil. I’ve loved their music forever and happened to see that they were going to be playing while I was at another concert (Skinny Puppy, another awesome show if you get a chance to go). So glad I got to see them. Great, loud music, and the show is full of energy. The band hung out outside after the show, chatting with everyone. No stupid extra fee for vip access in an awkward, one sided meeting. They really do seem to love their fans.

Well, type to ya next time.

Window Shopping & model making

Huh, well look at this. It’s only been a little over a week since my last post. That’s, like, a new record for me. Anyway…

Read part 1 here

As I began getting the ideas down for the guitar body, I needed to start figuring out the sizes and shapes for everything so I could fit them in the body. Spoiler alert: I didn’t do a good enough job and some of my assumptions were waaaay off, so I had to do a lot of hand shaping to fit everything after cutting the body, but I’ll get to that later.

First thing I wanted to know was how big could the guitar body be. That would help me finalize the outside dimentions of my guitar body design, and help define what extra bits I could wire up. As I mentioned in my last post, I wanted 2x tone pots, 2x volume pots, 1x blend pot, and 2 humbucker pickups, and it all had to sit so that my wife could use them without being in her way.

I found 4 main sites that carried body blanks that I was interested in purchasing in. The first, StewMac.com, pops up any time you google for guitar making supplies. After looking around for a bit I had a better idea of the names for things I was looking for. A body, neck, and fingerboard (or fretboard) blank. After searching for electric guitar body blank, guitar neck blank, and guitar fingerboard blank, along with StewMac, my second site kept coming up, ExoticWoodZone.com. And after a long night of searching, I came across my third. I can’t remember the details, but they had some beautiful wood and the option to select your specific piece. That site is Maderasbarber.com. Another spoiler: I have since purchased from all of these sites, and was happy with all of them. But note, Maderas Barber is shipping from Spain, and the wood you’re buying can be pretty heavy, so be prepaired for some shipping fees, and be prepaired for some shipping times. My wood was shipped fast via Fed Ex, but stalled out in one Franch depot for about a week and then again in New Jersey for another 4 days. But again, they had some beautiful woods, I was able to pick my specific piece, and the people I had contact with were super friendly, helpful, and quick to get back to me.

Going through these sites, I found that I could count on 20 inches * 14 inches * 1.75 inches. So I created myself a block with these dimensions in Fusion360 to act as a guide and then imported my sketch from Illustrator, trimmed some lines, added some others, and made a few extrusions and I had a base body to work with. I tried a few different ways of chamfering the edges, but but I’m not great at modeling and ultimately decided I would shape the edges by hand.

Next I went looking for pickups. That’s the little boxy thing that sits under the strings and generates the signal that heads out to your amp. Pretty important. At first I thought I could make one myself. After all, they are basically just magnets and coils. About the same as an electric motor, just spread out in a different arrangement. But to get the wire into a nice, clean coil I would need some kind of hardware. I could buy one, but I have never needed to wind a coil myself before, and would probably not need to do so in the future so that wasn’t practical. I could probably 3d print one, but I looked at the designs out there and wasn’t convinced they would be worth the time and frustration. I could try by hand, but thousands of rotations just sounded like an error-prone headache, and thousands of chances to screw up. So shopping I go.

Now I’ll admit, flashy packaging kinda got me this time. While looking for pickups, this one design kept sticking out to me. The Lace Music Alumitone Deathbucker. I mean, it just, just look at it.

After some research and reviews, I decided it might actually be worth trying. There are a few different colors available that will let me compliment the wood I get for the body. So I grabbed the demensions from the page and tried to model it into the guitar body. I didn’t want to use any pick guards so that I could show off more of the wood, so I had to cut through the back of the guitar to install everything. That was fun (note the sarcasm).

To work on something easy, I went looking for pots (potentiometers, aka the knobby things). For this I just picked some up on amazon.com along with some knobs that I knew my wife would like. Then I grabbed the dimensions and started putting them into my model.

Now when I say I added something to my model, I mean that I created a rough shape fitting the part and used it to cut out part of the body model. But when I got to adding the pots, I began having problems with grabbing just the parts I wanted and moving them, and if I made a change to one pot I had to keep going back to the others to make the same change. This is where I went back and created a new model file for each item and then imported them into the body model so that when I needed to change a piece, I could change it in its file (complete with change history) and then just update the reference in the body. They were still just simple roughs of the shapes, but I could quickly update them to add detail or change something else and basically leave the body alone.

Other than the neck and fingerboard, I was almost roughly done with the model for the body. But I’d need to model the neck too to know what to do with the body, so I leave that for later.

But I did need to figure out how to suspend the strings. This normally involves a tailpiece to secury the strings at the body, a bridge to align the strings and lift them over the pickups and high enough to clear the frets, as well as terminate the vibration wave at the body end, the knut to align the head section of the strings and end the vibration wave at the head end, the head to hold the tuning machines, and the tuning machines that wrap the string around them to pull them tight and hold them in tune. But I found a cool way around this. A headless bridge!

The way a headless bridge works is that the strings at the head are secured in place with a sort of non-adjustable knut, and the body end of the strings go over a saddle, just like a normal bridge, but then connect to a tightening machine that is mounted horizontally instead of vertically. Instead of reaching for the head to turn a machine to tune your guitar, you reach down behind where you normally strum and twist a knob to tune your guitar. Now, I have to admit, this was going to be more expensive. Probably the most expensive piece of the whole guitar. But the whole point of this guitar was to be a gift for my wife, to be unique, and to be damn cool. Not to build a cheap guitar. So I grabbed the dimensions on the site and created a model.

Lastly, I wanted a Fender style jack that plugged into the front of the guitar. That was fairly easy to find, but the dimensions were not. So I had to look for references in the images, like the length of a plug, a finger, whatever, and create a rough model as a placeholder. Caps (capacitors) were the only thing left to find, but I could wait until I was buying to figure those out because they weren’t going to take up more space in the body.

I now had a better idea of what the body was going to look like, where things needed to go, and about how big it was going to be. I knew that I needed to at least get some kind of wood shaping hand tools, and my mill bits needed to be able to clear about 1.5-2 inches. Christmas was getting close and I needed to get working. I figured I needed at least 2 weeks to get everything done.

Bwahahaha. I was so wrong.

A 4+ month late Christmas present

As I mentioned in my last post (way back) I decided to make an electric guitar for my wife. For a ton of reasons, it’s taken me much, much longer to finish than I expected, and it’s taken way longer than it should have. But I am now approaching the end, and wanted to start a set of posts to document all that I went through.

When first deciding to make the guitar, I was pretty ignorant to the work I was taking on. None of it was necissarily hard, but some of it was time consuming, some was frustrating, and all of it was something new I had to learn. I didn’t even really have a solid idea of the shape I wanted. All I was really sure of is that the neck had to be comfortable for my wife and the guitar had to be cool. Cool sound, cool wood, cool shapes.

I did some initial research on the size of a guitar body and found a few places that sell body blanks, a slab of wood, usually around 21x15x2 inches with some variation for specific situations. Once I had a size to work with I hopped into Adobe Illustrator to start messing around with some shapes. After a bit of getting a feel for the size, I headed over to Etsy to see about picking up some svg files in the shape of some critters I knew would fit her tastes.

First, I bought some bat svg files, and tried throwing a guitar body together with that, intending to make it look like bats flying in front of the moon. I pretty quickly abandoned this failure:

Design with bats silhouetted against a circle

Maybe I’ll come back to that later and make it better with a future project.

So, my second attempt was to try to turn a shape more like a squid into a guitar. Cephalopods are my wife’s favorite creatures, so back to Etsy I went to get a svg or two of squid and octopus designs. After a week of working on the design and disliking where it headed each time, I gave up on the animal based design idea altogether. I disliked the designs so much I don’t even have a copy left on my computer!

Feeling bummed after having spent most of my November just trying to come up with an idea, I began looking at guitar designs for inspiration. There are so many sweet looking guitars that I had to just start taking screenshots to remember the shapes.

After having seen this latest season of Stranger Things, my wife has been all about Eddie Munson, and I hovered over the B.C. Rich Warlock guitar design. (I grabbed this picture from musician’s friend’s listing. I’d have just linked to it, but I hate when my images go dead because they change their url style or whatever.)

B.C. Rich Electric Guitar

But there was another guitar that caught my eye. The ESP E-II FRX. It looked sharp and soft, dangerous and beautiful at the same time. So I set that up as my background and began throwing curves over top of it.

I didn’t want to rip it off exactly, so I let my curves go wide, moved some here, some there. I knew I wanted tone and volume control for each pickup, so I designed mine for 4 nobs along the bottom edge. And though the ESP doesn’t have a switch, I wanted to let my wife play around with the tones between the pickups, but didn’t want to put a switch in. So I designed mine with one more nob on the top edge and tried to put it back far enough to keep it out of the way when she’s strumming. The initial design of the guitar body took me a good 100 hours or more. Some of that was trying to figure out how to do something I wanted to do, some of that was designing dummy plugs to design as cutouts in the body. And a lot of it was fighting with curve handles that wanted to jump all over the place without warning.

Despite my changes, though, you can definately see the inspiration. All of the design from here on out is done in Fusion360 (with one minor exception a ways down the line).

Cad Drawing of guitar
Wireframe cad rendering of guitar
Shaded Cad rendering of guitar

Next, it’s time to start doing some window shopping and research.

Holy shit, what a year!

I feel like a lot has happened this year, so I’m sure I’m going to miss out on a number of cool things, but lets give it a try and see if I can get most of it.

I began building a Voron 2.4 3D printer. Two of them in fact. One for myself, and one for my wife. She’s been taking up all the time on my printer and that’s been making it hard for me to fit in some of the stuff I want to print. So, we’re buying it bit by bit, and as of writing I’m stalled until some other projects close out and free up my time and money.

I killed my Qidi Tech I. This was my only filament printer at the time. While trying to figure out why my prints would suddenly begin failing and then give me tons of trouble getting level again, I broke the wiring on one of my thermisters and didn’t have a replacement. After some more intense observation and measuring and wating, I was able to figure out that the matte PLA filament my wife loves was eating up our nozzle. Because the hole on the nozzle was getting larger with every print, it would end up with an under-extrusion situation where it was trying to feed 0.4 amounts of filament to a 0.6 hole and the glob wouldn’t get enough nozzle pressure to push it to the plate and get it to hold.

So, how did this lead to me breaking the printer?

Well, the Qidi Tech I is a dual head 3D printer so when the thermistor wire broke, I swapped over to the other head and kept printing. When I finally figured out the problem I ordered some abrasion resistant nozzles. While I was doing that, I decided to replace the thermistor and get back up to full capability. I had to remove the power lines to the board (24v) to replace the wiring for the thermistor. I checked and double checked the polarity on the board, and made sure to wire the red lead to positive and black to negative. As an American, this made sense. But I guess in China, where Qidi is located, the wiring goes the other way around. So the power from the relay was wired the Chinese way, and the board was wired the American way.

When got everything else wired and plugged in I was ready to get printing again. I had Voron parts to finish! When I flipped the switch to power up, the display lit for a second, there was a small little sound inside the printer, and then nothing. I switched the power off, tipped the printer on it’s side so I could open the bottom and see if anything obvious happened. When I flipped the power again, smoke began rising from an IC and then it looked to be glowing red. I turned the power off again and looked closer and saw that probably 1cm or so of the PCB lead near that chip had burnt. For me, that was it. A dead board.

To make the rest of the story short, I bought another board and promptly shorted that one with a screwdriver. Finally I got a real upgrade, a Bigtreetech Octopus v1.1, a set of TMC2209 stepper drivers, a bltouch, a filament runout sensor, and some new, lower profile, limit switches to give myself just the tiniest bit of extra print space. I couldn’t just put marlin on the board because that would be too normal. So I spent a day re-wiring the whole 3D printer and then 3 days configuring Klipper, which included me wiping the whole Raspberri Pi disk to start over 4 times.

Everything was working, I did a number of calibration prints and things were looking good. Except the lighting. I thought the lighting was crap. So I got some RGB LED strip lights and wired them up around the top of the printer. But, while wiring up the LED lights to the control board I accidentally plugged something back in that shorted the 24v rail to the 5v rail. This fried the board and a number of components. I got another Octopus because my wife didn’t like me being mopey. Once I got it back in and wired up, it was a long game of guess the fried component. I fried another BL Touch playing this game but got to the place I am now, everything seems to be going okay, but the BL Touch won’t register the touch, so the printhead crashes into the plate. And then I got pulled away onto another project and haven’t been able to make progress on it.

I built an OpenBuilds CNC machine for my wife. I actually didn’t have much problem with it. But building the table to put it on kind of sucked. I had to buy a new 3d printer to print the corner joints, and the only filament I had was some dark green PETG. So the table is strong, but has a ton of flex. But she’s been cutting almost non-stop since July, so it’s not really a concern yet, though I do want to get some CF infused Nylon to reprint the pieces.

When Augest was almost over, I began working on some of our new Halloween decorations. We usually like to buy one decoration a year, and build the rest ourselves. Well, I began by building some realist size hay bales for a new section we were starting in our side yard. I also built a scarecrow. But the one decoration we bought required some kind of protection to be outside, so I spent all the rest of the time leading up to Halloween building a shack for him.

And as soon as Halloween was packed up, my wife set me on all things Gcode, manufacturing her gifts, 3D printing on both the new 3D printer, and the resin printer, as well as setting up and running her jobs on the CNC machine. But I’m just biding my time until I get my chance to build a gift for her. I am building an electric guitar from scratch. I have learned a lot about guitars and building guitars.

Well, that was a lot longer than I had planned on it being, but I think we’re mostly caught up now. I wonder what my next obsession will be.

Wow, I finally made it back

You ever have one of those things where you know you have to do it, and you mean to do it, and you plan to do it, but when it comes time to do it you just don’t do it? That has been posting here for the past here. I’ve planned on writting a post catching up with everything but when I get some time to write a post I feel like it’s too much to post and end up doing something else. But now I’m forcing myself to do it.

Update 1 – I’ve got my electronics workbench to a state where I feel comfortable working on stuff. I have a soldering and reflow station, a nice overhead light, a work holder, a controllable power supply and a lot of little screwdrivers and pliers. I’ve fixed a couple of computers and even a Game Cube (the nintendo console) at the workbench so far and I have a couple of projects I’m working on for fun. One of those is a universal remote for my house. I have ceiling fans in every room that are controlled with RF remotes and I want to control them from anywhere in the house, along with the IR controls for my TVs and Apple TVs. Another project is a programmable light controller for my wife’s shadow boxes. I still have a queue of projects to fix for family too, so I have plenty of use for this hobby.

Update 2 – Using my electronics workbench I’ve finally fixed my 3d printer and have gotten back into that. My wife has given me a queue of things to print that’s probably going to take me a year and hundreds of dollars in fillament to finish, and between those I’m working with FreeCAD to design my own parts for various needs around the house. Nothing big, just a tray for some electronics projects, some spacers for a computer stand and things like that. But I guess learning to design parts in CAD software is another skill that I can further develop.

I’ve also cleaned up and recalibrated my resin printer. Prints still seem to be failing after a few layers of supports, and that’s frustrating, but I’ve been reading and it looks like maybe if I lay out my prints a little better that problem could be resolved. It sure would be nice to have this printer back up and running so that I can print high resolution models. But right now it’s a lot of stink and a lot of mess for a lot of frustration.

Update 3 – I’m back into book making. I decided to make books as some gifts for Christmas and it reminded me of how much I love doing it. My mom asked me what I mean when I say I make books. I cut and fold the paper. I sew it together and build a spine before attaching end papers. I cut a material for the cover (mostly leather remnants but I’ve been looking at expanding to cloths). Then I cut some backing board, which usually ends up being chipboard but I’ve also used thin wood boards too, before gluing the cover to. I turn in the cover and then attach it to the book end pages, super (a cloth part of the spine that sticks out far enough to glue to the backing boards) and spine. So I tell my mom that when I say I make books, I mean I make books. And I love doing it. I have decided though that I need a few tools. I’ve been doing this with just a stack of books, a hammer, and a razor. I have begun building some of those tools with my clumsy excuse for woodworking.

Update 4 – I’m building a CNC mill from my first 3d printer. My first 3d printer was a delta printer. That’s the kind with 3 arms and no horizontal moving parts. It uses a bunch of triginometric transformations to determine where to move the arms to push a center piece to a point that you want to print. But of course with my little tweaks here and “upgrades” there it became mostly unusable. I’ve harvested some parts for other projects but still have the 3 motors and control board and various other pully parts. So I’ve decided to build myself a 3 (or is it 4?) axis cnc mill for cutting aluminum parts out for projects that need something stronger than a plastic 3d print. For now I’m working with only parts I have in the house, of which I have a lot because I take apart any electronic or mechanical thing my wife wants to throw away. I can also 3d print many of the parts I need and don’t have until the mill is working and I can mill replacements from aluminum. The only parts I know I’ll need to buy for sure is a motor for the spindle and the milling bits. I also have to figure out how to get the RAMPS board to handle CNC GRBL code instead of 3d printer G code (which is a repurposed and non-standardized GCODE).

Update 5 – I’ve taken up jewelery making. Well I guess for now it’s only lapidary work. I started with a 2 lb rock tumbler and then moved on to hand grinding stones with sandpaper while those tumble. Oh god that takes for ever. I’ve made a teardrop shaped cabichon from pink opal and a 4 sided die from some gray stone that I’ve not identified yet. My wife bought me a wire wrapping kit and I’ve been drawing up my own designs and trying those out. Just last night I finally got the okay from my wife to get a cabachon cutting machine and I’m excited for that to get here. I’ve found a couple of places online where I can get some cool rough rock for cheep and can’t wait to get some of those made into jewelery. Maybe this summer I’ll even get a hat and go out finding rocks locally. That’s a challenge because I break out in hives with too much sun, on top of burning within half an hour. Still, with some spf 9million and a wide hat and long sleeved clothes I should be good. We have some really cool places to find minerals here.

Misc – My wife still plans on doing her etsy store this summer, and I’m planning on using some of my hobbies to help her populate it. So my job is to build up some inventory of books and jewelery. Once my skills get more refined I may open my own shop, but right now I have no interest in that.

I’ve promised my wife to focus on these hobbies: writing, jewelery making, book making, and tinkering to support other tasks. That means no more working on my car, no more music production stuff, no more film making stuff, and no more flittering to new hobbies… for now. Let’s see if I can make that stick.

I’ve also promised to take my narcolepsy treatments seriously. That means taking my meds in the morning and really trying to sleep at night. How hard this is is really underestimated by anyone who doesn’t have to deal with it. But I’m going to give it my best.

Oh, I mentioned writing above. I actually managed to bang out about half a book over NaNoWriMo. It’s a decent start. I’m not happy with it yet, but once I finish and begin re-writing and editing the real magic happens.

Well, I feel like that’s a pretty decent update. I’m going to post more frequently, though I can’t promise daily or weekly.

It’s been a while

So, yeah. I’ve been meaning to post, like every week since my last post, but couldn’t really get myself to do it. I guess it’s been a bit of a low time for me. The thing about my bipolar mood changes is that I’m the last person to notice them, so I don’t know how long really I’ve been down.

But, on the up, and down, side, I’ve kept up with my latest obsession. Comics! I’ve spent way more than I probably should have. I don’t know how much I’ve actually spent, I haven’t really kept track of it, but I know I bought at least $900 worth of comics since the last post, maybe more. I keep trying to talk myself into stopping, but there’s always “just one more” for me to buy.

I’ve also been trying to keep myself going along with the electronics and game dev interests too, but they feel like so much hard work right now. That’s probably the depression talking. I pretty much just spend my days working, then napping. Comics are something I can do without a ton of extra moving, but the other two take much more brain and energy, and I can’t muster that right now.

I keep hoping to flip the other direction, but I don’t really have control over that. I’ve tried skipping some meds to help alter my brain, but I just end up getting the brain zaps. And while they can be a little fun at first, when I start feeling them in my lips and can’t keep balance I know it’s time to take my meds again.

I’ll try to post again soon. Wish me luck.

My Current Obsession: Game Development

I’m still eagerly awaiting my first comic book shipment. My first comics were added to my shipment today! Still, it’s not going to be shipped until the 14th of April. I have to do something to keep myself from checking atomic empire’s site every 10 minutes.

I’m not sure how my interest got peaked this time. Perhaps I was looking at Steam? Or I was just looking through my installed apps on my Mac for something to distract me and saw the Epic Game launcher which also performs as the Unreal Engine launcher. Whatever the way, I decided to install the latest Unreal Engine (4.26.1) and began looking through the market place for plugins.

In all I have ended up with 27 free plugins that I felt I could use, and another 31 paid plugins on my wishlist that I really feel I could use. I’ve also downloaded and installed Blender and Daz 3D.

Funny side story. I used to work at a software company that developed retail software. As in, Point of Sale (cash register), inventory management and ordering, scheduling, etc. In the same building was a small, one office company called Daz 3D. I had no idea what they did, but when I’d go out to smoke, their lead QA would sometimes be out there too. It took me over a year to ask what they do, and he told me that that they had replaced Poser and now manage sofware for character design and whatnot. He worked on the online warketplace. When I’d played with Poser in the past it seemed like an expensive toy. I asked him what people use it for and his anwer was, “people animate characters for games and CG. But mostly it’s used for porn.”

So, I kinda felt naughty downloading Daz 3D, but I figured I could look into using it for character animation.

Last night I spent about 3 hours trying to remember how to use blender, though I was never really good. I think I may have to start off with goofy looking characters to start with.

Now I just have to get to it. Finally an obsession I don’t need to buy stuff or wait on. If I ever get something done, I’ll post a link on this site.

My Current Obsession: Comic Books

So, I’m not sure what triggered this one. Just, one day last week I started looking for comic book subscriptions. That night I asked my wife if there were any comics she would want. She listed a couple and I was off. I created an account at atomicempire.com and started adding stuff for subscriptions. Before I knew it I had something like 50 comics on my list.

After having a hard time trimming the list down, I asked my wife how much I could spend per month. She said probably no more than 60. So I kept trimming down the list.

I finally got it down to 20. But I keep adding them back. I’m back up to 35. I don’t think I want to miss out on some of these. I also secretly bought all the back issues of Buffy the Vampire Slayer for my wife. Maybe to convince her to let me keep them.

Since then I have ordered some comic storage boxes and comic dividers. Last night I organized all the comics we already have and labeled the dividers and put them into one of the boxes. We have allmost a whole box full already. It’s mostly filled with my Fight Club 2 and Fight Club 3 comics and variant covers, but also includes my wife’s Cable and Ghost Rider comics. I’m pretty sure with 30+ comics coming a month we’ll finish filling up that box and start on the next one in no time.

Next I have to hunt down all the back issues of the comics I subscribed to too late to get issue #1 of. The 2019 run of X-Men, Spawn, Miskatonic, 2021 Suicide Squad, Vampire: The Masquerade, New Mutants, Children of the Atom, and Strange Acedmy. Below is a full list (at time of writing) of the comics I decided to subscribe to:

  • Alien (2021)
  • Aquarius: Book of Mer
  • Black Beacon
  • Buffy the Vampire Slayer (2019)
  • Carnage: Black, White, and Blood
  • Cherry Blackbird
  • Children of the Atom (2020)
  • Cojacaru the Skinner
  • Cult of Dracula
  • Cyberpunk 2077: You have my word
  • Future State Gotham
  • Great Gatsby
  • Harley Quinn (2021)
  • How to Read Comics the Marvel Way
  • John Carpenter’s Tales of Science Fiction: Hell
  • Joker (2021)
  • Lady Baltimore: The Witch Queens
  • Locke and Key / Sandman: Hell and Gone
  • Minky Woodcock: The Girl who Electrified Tesla
  • Miskatonic
  • New Mutants (2019)
  • Nightmare Before Christmas: Mirror Moon
  • Picture of Everything Else
  • Red Room
  • Rise (2020)
  • Shadecraft
  • Shadowman (2020)
  • Silk (2021)
  • Silver Coin
  • Spawn
  • Strange Academy
  • Suicide Squad (2021)
  • Vampire: The Masquerade
  • Way of X
  • Women of Marvel
  • X-Corp
  • X-Men (2019)
  • You Promised Me Darkness